
Nebulink User Manual
Welcome
Nebulink runs on your Windows PC and controls your ZWO Seestar smart telescopes over your home Wi-Fi. It finds your scopes on the network by itself, builds a whole night's plan for you in five steps with Nebulink Whiz, picks the best targets for each night from the forecast and the Moon (including comets, the planets and the Moon), shows live status and sky conditions, points the scope from a star chart, runs a whole night's imaging plan unattended, and gathers your pictures in one album.
Take the tutorial. Click Tutorial near the bottom of the page list for a guided walk through Nebulink: it highlights one part of a page at a time and explains it, in about 20 short steps. It only opens pages; it never moves your scope. Use Next and Back (or the arrow keys), and Esc or Skip tutorial to stop.
Watch the how-to videos. How-to videos in the page list shows the short how-to series from the Nebulink YouTube channel; click one to play it inside Nebulink (it needs an internet connection). On most pages, the red ▶ button at the top opens the video for that page, starting at the part about it, and the Map your horizon box in Live view has its own ▶ Watch how. New videos appear in the list by themselves when they're posted.
New to Nebulink? Open Quick start at the top of the page list (it opens by itself the first time) and press Show me something amazing: Nebulink picks the best target in the sky and images it for you. To plan a whole night, open Nebulink Whiz under Plan the night: it picks a night, chooses targets, orders them and starts the plan for you.
Nebulink works with the Seestar S50, S50 Pro, S30 and S30 Pro, and you can connect several scopes at once. It is an independent product and isn't made by ZWO.
What you need
- A Windows 10 or 11 PC (64-bit) on the same Wi-Fi network as your telescopes
- The official Seestar Android app file (.apk or .xapk), used once to set up the connection key
- Each scope switched on and joined to your home Wi-Fi (Station mode in the Seestar app). Nebulink finds them for you.
- An internet connection on the PC for the weather forecast and sky photos (everything else works offline)
What's new in 2.2
New in 2.2.102
- Auto-crop. In Enhance, ✨ Auto-crop scans the edges for empty strips, noisy fringes and uneven brightness and crops them off.
- More languages. German, French, Spanish and Chinese cover the newest screens, buttons, PC gauges and the PC-during-the-night graphs.
- Get GraXpert. When GraXpert isn't on this PC, Enhance shows a button that opens graxpert.com.
- Update notice. Nebulink reads it from downloads.getnebulink.com, and from getnebulink.com if that can't be reached.
- Version. Nebulink 2.2.102 is the current release.
New in 2.2.99
- First launch fixed. A new install opens the Overview in Beginner (Quick start in Advanced).
- Faster update check. Nebulink looks for a newer version a few seconds after it starts, then once a day. It sends nothing about you or your PC.
- Version. Nebulink 2.2.99 is the current release.
New in 2.2.98
- Beginner starts clearer. New installs open in Beginner. If you used Nebulink before, it opens in Advanced until you choose Beginner under the scope boxes.
- Start here on the Overview. In Beginner, the Overview opens with three steps: connect your Seestar, choose tonight's target, start the session. Sun & Moon, the Seestar storage card and the log are hidden in Beginner.
- Fewer pages in Beginner. Moon, Planets and Planet stacker are hidden from the page list in Beginner. They stay in Advanced.
- Setup checklist hidden. The five-step checklist no longer shows on the Overview, in either view.
- Simpler menu in Beginner. Quick start is left out of the menu, and Help and settings fold behind one Help and settings button. The first launch opens the Overview.
- Beginner page names. In Beginner, the pages use the same plain names as the menu: Pick for me, What to look at, and Plan my night. Advanced keeps the original names.
- Help for each Start here step. In Beginner, each of the three Start here steps has a ? button. Click it to see what the step does.
- One telescope in Beginner. The Overview shows only the telescope you've selected. Use Advanced to switch between two.
- First launch offers the walkthrough. The first time Nebulink opens on a PC, it asks "Show me how it works?" and opens the Pick for me walkthrough. It asks only once; the Show me button stays on the page after that.
- Plain status words. In Beginner, the status bar says things like Taking pictures, Pointing at target, Waiting for dark and Ready. Advanced keeps the technical terms.
- Seestar picked for you. In Pick for me, if only one Seestar is online, Nebulink selects it, so you don't need to tick its box.
- Plainer messages. A telescope that can't be reached says "Can't find your Seestar. Check it's turned on and on your Wi-Fi." The technical detail shows when you hover over it. The empty picture panels now say what will appear there.
- Beginner home. With Beginner on, Quick start shows one status line for your Seestar, four big buttons (See tonight's best, Pick something to look at, Check my telescope, and Stop while something is imaging), and tonight's top three (see Quick start).
- Weather from the US National Weather Service. For places in the US the forecast comes from the National Weather Service, which is free and needs no key. Everywhere else it still comes from MET Norway. The Weather page says which one it used (see Weather).
- Sky picture sources. The Connection page has a Sky picture sources panel: one row for each site Best targets pulls its pictures from, a coloured dot for how the last request went, and Test now to check them. Best targets shows a line above the grid when a source is down (see Best targets).
- Refresh pictures, Retry picture and Clear sky-picture cache. On Best targets, Refresh pictures asks again for every card without a picture, each blank card has its own Retry picture, and Clear sky-picture cache deletes the saved pictures so they load again (see Best targets).
- No more "SkyView has no data" pictures. SkyView's fallback is turned off, because it returned a no-data picture that looked like a real one. A card with no picture now shows a blank with a Retry button.
- Phone alerts. A message on your phone when the plan finishes, clouds pause it, a target is skipped, or a Seestar stops answering, runs low on battery or fills its storage. Free, through the ntfy app or a Discord channel (see Settings).
- Nebulink on your phone. Pair a phone on the same Wi-Fi with a QR code and use Nebulink's pages from the garden or the sofa: watch the live view, check the plan, stop or park the scope (see Settings).
- Pause for clouds. A new Planner tick box: when no frames are kept for a few minutes, Nebulink stops stacking, waits 10 minutes and tries again, instead of wasting the target's time (see Planner).
- Your own horizon. Draw the trees and houses around you on the Settings page. The star chart shows them, and Best targets, Whiz and the Planner treat a target behind them as not up (see Settings).
- Projects over several nights. Set a goal, like 10 hours on M 31, and Analytics adds up every night's time toward it; Whiz puts your projects first (see Projects and mosaics).
- Mosaics. In the Planner, pick 2×1 up to 3×3 panels for targets bigger than the Seestar's view, like the Andromeda Galaxy or the Veil. The framing shows each numbered panel (see Projects and mosaics).
- Play tonight. ▶ Play tonight under the star chart's time slider plays the whole night in about 24 seconds, with your plan's targets lit up as their turn comes (see Star chart).
- Share picture. In Enhance, Share picture saves the picture with a caption strip (the target, exposure, total time and date), ready to post (see Enhance).
- Backup and restore. One file with your scopes, places, plans, horizon, projects, history and settings, to keep safe or move to a new PC (see Settings).
- Change a planned target in place. ✎ on a row in the Planner's queue changes its minutes, subs or filter without removing and adding it again (see Planner).
- Update notice. Nebulink tells you when a newer version is out, with a link to download it. It sends nothing about you or your PC.
New in 2.2.88
- Framing. The Planner's framing map gets its sky picture through this PC, trying CDS and then STScI, so the object shows when one server is slow or down. Frame it in Best targets opens the framing even for a target the catalog lookup misses, and works when the Planner is already on screen.
- Clearer sky picture messages. When the sky picture can't load, the Overview and target details say so, and that the blue box still shows your field.
- Horizon scan in EQ mode. The automatic horizon scan now works with the Seestar in EQ mode too. Before it starts, it makes four short test moves to learn how the mount turns, then scans as in Alt-Az.
- Save each frame. The Stacking page has a Save each frame switch, the Seestar's own setting from the Seestar app's Advanced functions, so you can keep every frame and stack it yourself in your stacking software. It shows the setting's current state.
- Stacking messages. While the scope is getting ready ("Initialize"), the status says Getting ready, not Stacking stopped.
- Live view. When the camera comes on during a stack, Live view shows the Stacked picture instead of live video.
- Exposure counters. The count stops at the exposure length, and reads This exposure.
- Star party mode. An object without a fact card says so and points to the code for more.
New in 2.2.87
- Connection page. A new Connection page under Help checks this PC's Wi-Fi and addresses, whether another copy of Nebulink is running, and whether the sky-picture servers can be reached. It also runs the port test (UDP 4720, TCP 4700 and 4800), scans your network for scopes, and shows the latest log lines. Close the Seestar phone app and stop any plan before the port test.
- PC setup check. Check PC setup on the Connection page looks at the Windows firewall, whether the network is Private, VPN and virtual adapters that could take the scope's traffic, a program holding UDP 4720 or port 8050, Wi-Fi power saving and the saved scope addresses. It changes nothing; each finding says what to do.
- Version. Nebulink 2.2.87 is the current release.
New in 2.2.86
- Best targets pictures are kept on this PC. The sky-survey picture on each card and in the target panel is saved the first time it loads, and the saved copy is used after that. Pictures that fail to load are not saved.
- Version. Nebulink 2.2.86 is the current release.
New in 2.2.85
- Map your horizon uses the telescope camera. Opening it while Wide-angle is selected switches to Telescope, and Wide-angle is blocked while it is open, with a message saying why.
- Version. Nebulink 2.2.85 is the current release.
New in 2.2.84
- Lifetime licences from free codes. A license bought for $0 (a 100% discount code) gets updates for life. Paid licences keep one year of updates, and renewals still add a year. The license box shows Updates until: Lifetime for these.
- Version. Nebulink 2.2.84 is the current release.
New in 2.2.83
- Burst on the Planets and Moon pages. Next to Save photo and Record video there is now ● Burst and a box for how many pictures (pick 25, 50, 75 or 100, or type any number from 2 to 1000). Press it and Nebulink saves that many frames from the live video, one picture each, in a folder of their own under your photos folder (Pictures\Nebulink, or the folder you chose). The page counts them as they come, and ■ Stop burst ends it early. Zoomed in, each picture is the part you see. Stack the folder afterwards in a free tool such as AutoStakkert or PIPP, or open it in the Planet stacker.
New in 2.2.82
- Wind in km/h. A new button next to °F / °C in the header switches wind speeds between mph and km/h: the Overview, the Weather page (now, tonight, the charts, the tables and the hover box), the watch-outs and the weather history all follow it. Nebulink starts in mph in the US and UK and in km/h elsewhere, and remembers your choice. (Asked for by Jerome, on 2.2.77.)
- Capture settings in Nebulink Whiz. On the Night step, Exposure per frame sets how long each frame is. Alt-Az mode offers 10, 20 and 30 s; EQ mode offers 10, 20, 30, 60 and 90 s. Whiz starts with 20 s in Alt-Az and 30 s in EQ. The Planner's exposure list also has 90 s in EQ mode.
- A Look menu for planets. On the Planets page, Look offers the Moon's color filters (Mineral color, Red only, Green only, Blue only, Blue minus red), Relief and a gentle Sharpen. Your choice is remembered, and Save photo saves a copy in the chosen look. The Moon page's Save photo now applies its Look too.
- A new icon. The animated Nebulink logo is in the header, on the About page and as the browser-tab icon.
New in 2.2.81
- The horizon scan on the Settings page too. Under Your horizon there is now the same Scan it automatically box as in Live view (the whole circle or a half, Start, Stop, Continue and the time left). Only one is shown at a time; both scan the same spot.
New in 2.2.80
- Search the manual. Type in the box above Contents on the Manual page. Nebulink lists every line that has all your words, with the section name; press one to jump to it. Esc clears the box.
New in 2.2.79
- New how-to video: The Planets page. Video 34 on the How-to videos page shows the Planets page: pick a planet, slew and center, zoom and the arrow pad, camera and focus, the finder camera, and photos and video.
New in 2.2.78
- A note on the Planets page about results. Under the live view: Nebulink can't guarantee that the planet will be found, centered or sharp, or how your finished pictures and videos will look, because the seeing, the planet's height and your Wi-Fi decide a lot. Press ✕ to hide it.
New in 2.2.77
- Weather works on PCs that can't check the weather site's certificate. Some Windows PCs lack a root certificate that the forecast (MET Norway), the weather map and the radar need, so the Weather page said the forecast couldn't be fetched, scope or no scope. If the PC's own check fails, Nebulink now checks again with the root certificates that come with it (the chain and the site name are still fully checked).
New in 2.2.76
- No more endless video warnings from the finder camera. When the wide-angle camera sends no picture within 25 seconds (the scope has no wide-angle camera, or isn't streaming it), Nebulink stops asking and the corner box says No finder picture. Before, it kept retrying every few seconds and filled the console with "Stream timeout" warnings. It tries again when you tick Finder camera again or press Turn on camera.
New in 2.2.75
- Camera banner on the Planets page. A green Camera on banner (with the mode, the target and what the scope is doing) shows above the live view while the camera is running, and an amber Camera off banner when it isn't, or when the arm is folded.
New in 2.2.74
- Whiz keeps clear of the Moon. When the Moon is bright (30% lit or more) and up, Whiz no longer picks targets that sit within 35° of it for much of your window, and "Let Whiz pick again" doesn't bring them back. They stay in the list, marked Moon close by and scored lower, if you want one anyway. If nothing else fits, Whiz uses them rather than leave the night empty.
New in 2.2.73
- Keep the Moon centered. A new tickbox on the Moon page. The Moon drifts across the sky by about its own width an hour, so with it ticked Nebulink checks the picture about once a minute and, if the Moon has drifted from the middle, centers it again. It leaves the scope alone for 90 seconds after you use the arrows.
New in 2.2.72
- A parked scope says Parked. A Seestar with its arm folded kept showing "Viewing Saturn" in the status box because it still reported its last Solar System view. It now says Parked.
New in 2.2.71
- Finder camera on the Moon and Planets pages. Tick Finder camera under the live view to see the wide-angle camera as a small picture in the corner, so you can see where the scope is pointing. Press it to make it bigger or smaller. The S30 Pro streams its wide-angle camera only in Solar System mode, so press Turn on camera first.
New in 2.2.70
- Center on the Moon (or a planet) now searches for it. When the Moon isn't in the camera's picture (the scope's idea of where it points can be a degree or more off), Nebulink no longer gives up: it moves the scope around in a growing square, a step at a time, until the Moon shows up, then centers it.
- Aim check: the stars are put back in focus. The scope's own focus step during the GoTo can fail ("no star is detected") and leave the focuser far out. When a solve fails, Nebulink sets the focuser back to your last good focus (or runs an autofocus if it has none).
New in 2.2.69
- Aim check: focus on the stars if they won't solve. The focuser sits where the Moon or a planet was focused, so the stars in the aim check can be too soft to solve. If the scope hasn't solved after a minute, Nebulink now runs the scope's autofocus on the star field, then lets it solve again (it waits up to four minutes in all).
New in 2.2.68
- The aim check also runs from Turn on camera. In 2.2.67 only the Slew buttons did the star-field aim check; the Moon page's Turn on camera (and a scope already in a Moon or planet view when Nebulink starts) skipped it, so the S30 Pro still slewed by a stale aim. Both now do the aim check first when the scope hasn't plate-solved since Nebulink started or since the arm was folded.
New in 2.2.67
- Moon and planets: an aim check after the scope was folded or started. The bright Moon (or a planet) blinds the scope's plate solve, so after the arm was folded, or when Nebulink has not seen a solve yet, the scope slewed by a stale idea of where it points and the Moon was nowhere in the picture (S30 Pro, 25 Oct). Now the first Slew goes to a star field about 20° away first, so the scope plate-solves and learns where it really points, then goes on to the Moon or planet and centers it. It adds a minute or two, once.
New in 2.2.66
- Planets page: Smart focus. Nebulink moves the focuser in small steps around the last good focus, measures how sharp the planet is in each picture of the live video, and goes to the sharpest, in two passes (about two minutes). Center the planet first. Autofocus after centering now checks the scope's own autofocus found a clear focus, and if it didn't, runs Smart focus by itself. A focus found this way is remembered for Back to last good focus.
New in 2.2.65
- Planets page: zoom to 16×. Two more zoom buttons, 12× and 16×, for a small planet like Saturn. Zooming is digital, so the picture gets coarser the closer you go; Save photo keeps the zoomed-in part at the scope's full resolution.
New in 2.2.64
- Planets page: arrows on the live picture. The same nudge arrows and STOP as the Moon page, in the corner of the picture, to bring a planet into view when Center it can't find it. Hold an arrow to move; let go to stop.
New in 2.2.63
- Planets page: focus buttons and Back to last good focus. A Focus row under the camera buttons moves the focuser in or out (−50, −10, +10, +50) and shows where it is. Whenever an autofocus finds a clear sharpness peak, Nebulink remembers that position for the scope; Back to last good focus returns to it. An autofocus that ends with no clear peak does not replace it. This came from Saturn on 25 Oct, when the scope's own autofocus wandered out and left the focus far off.
New in 2.2.62
- Planets: Slew again no longer loses the focus. Pressing Slew to ... and center it with the scope already on that planet now just centers it again. Before, it sent a new GoTo, and the scope ran its own autofocus on the middle of the frame, which threw Saturn out of focus (S50 Pro, 25 Oct). A dim planet in the picture is also found more easily when centering.
- Planet stacker. A new page under After that turns a planet video (record one on the Planets page) into one sharp picture. Choose the video, how much to keep (the sharpest 10, 25 or 50%) and how much to enlarge, then press Stack video. Nebulink finds the planet in every frame, lines the frames up and averages the best ones. Then use Suggested settings or the sliders: fix red/blue color edges, Deconvolution (undoes blur), four detail levels with a noise cut, color, brightness and contrast. Compare with one frame shows what stacking added. Save PNG or Save JPG puts the picture in your photos folder. Works best on a video of a calm moment; stack a minute or less.
New in 2.2.61
- Planets page after a reload. If Nebulink was opened or reloaded on the Planets page, the live picture didn't start until you picked a planet or pressed Turn on camera. It now starts as soon as the scope is found.
New in 2.2.60
- Two more how-to videos. The How-to videos page now has videos 26 (Targets in the middle and darks after imaging) and 27 (What's new in 2.2.20), so the series runs from 1 to 33.
New in 2.2.59
- Planets page layouts. Choose how the Planets page is arranged with Layout at the top: Cockpit (planets, picture and camera controls side by side), Control rail, One column, Tabs or Step by step. Nebulink remembers your choice.
New in 2.2.58
- Planets page. A new Planets page in the sidebar, under Moon. Pick Mercury to Neptune (each shows how high it is now), press Slew to … and center it, and Nebulink sends the scope there in its Solar System mode, centers the planet in the picture by moving the scope a little at a time, and then focuses it. The live view has zoom up to 8×, Steady view, exposure and gain, Save photo and Record video (stack a recording in a free tool such as AutoStakkert for the best detail).
- Star chart. For a planet or the Moon, the button now opens the Planets page (or the Moon page) instead of sitting greyed out.
New in 2.2.57
- Steady view. Tick Steady view under the Moon picture to calm the shimmer you see when zoomed in. Nebulink lines up the last dozen video frames on the Moon, averages the sharpest few, and sharpens a little. It needs the live video; if the scope is only sending still pictures it has nothing to stack. Saved photos and recordings are not changed.
New in 2.2.56
- Compass on the live picture. A compass in the bottom-right corner of the Moon picture shows which way north (N) and east (E) run in it, with where the scope is pointing: RA, Dec, and the height and compass bearing in your sky. Untick Compass under the picture to hide it.
New in 2.2.55
- Look menu. It now matches the page's buttons (dark glass, rounded, a cyan edge when you point at it).
New in 2.2.54
- Moon page: less in the way. The three tick boxes (Mark the crater, Autofocus when zoomed in, Autofocus after centering) moved from the picture to the row under it, and the buttons left on the picture fade until you point at them, so zooming in shows more of the Moon.
New in 2.2.53
- Moon look. A Look menu on the Moon page shows the live Moon through a software color filter: Mineral color (tints boosted), Red, Green or Blue only, Blue minus red (a composition map), or Relief (sharper ridges and craters). Save photo then also saves a copy in that look next to the normal photo, which stays as it was. These are software filters on the color picture, so they can't show infrared or ultraviolet.
New in 2.2.52
- Crater ring, a better starting point. The ring now starts about 4° more turned and 4% further from the middle, which is what three test photos needed. Ring off? Click the crater still fits it exactly to your scope, and Reset the ring goes back to this starting point.
New in 2.2.51
- Turn on camera when it's already on. If the camera is already in Solar System mode, Turn on camera checks that the Moon is in the middle (moving the scope if it isn't) and then focuses, as long as Autofocus after centering is ticked.
New in 2.2.50
- Autofocus after centering. On the Moon page, once the Moon is in the middle of the picture the Seestar focuses itself. Untick Autofocus after centering to leave the focus alone.
New in 2.2.49
- Center the Moon, when the Moon starts at the edge. If a test move barely shifts the Moon (because the edge cuts it off), Nebulink undoes it and tries the other way, instead of giving up with "the scope didn't seem to move".
New in 2.2.48
- Center the Moon is steadier. When the live picture lags behind a test move, Nebulink no longer overestimates how far the scope moves, and the first move only goes part of the way. Before, a lagging picture could send the scope too far and lose the Moon.
New in 2.2.47
- Fit the crater ring to your scope. If the ring isn't quite on the crater, press Ring off? Click the crater, then click the middle of the crater in the picture. The ring, and every other crater's, is turned and stretched to match, and Nebulink remembers it on this PC. Reset the ring undoes it.
New in 2.2.46
- Moon page: Autofocus and Solar System mode. An Autofocus button focuses the Seestar now. Solar System mode is a switch: on turns the camera on in that mode (moving to the Moon first if needed), off goes back to the normal star live view.
New in 2.2.45
- Crater mark. The ring on the live Moon now allows for the Moon's tilt and libration, so craters away from the center (Tycho, for one) are marked on the right spot.
New in 2.2.43
- Moon color. A Moon that showed green in Live view or in Save photo is color-balanced to a neutral grey. It only applies when a big bright disc fills the frame, so star fields and nebulae keep their colors.
New in 2.2.42
- Mark the crater on the live picture. Pick a crater on the Moon page and a ring with its name is drawn on the live view where that crater is. It follows zoom and dragging. Untick Mark the crater to hide it.
- Zoom on the Moon page. If you opened Nebulink on another page first, zooming could show nothing. It works now.
New in 2.2.41
- Forecast on PCs that scan HTTPS. If the forecast or weather history can't be fetched because the certificate check fails, Nebulink logs the reason and tries once more with the extra strict rules off. The certificate and host name are still checked.
New in 2.2.40
- Conditions on the Overview. The Conditions card fills in again, and in the morning it shows the coming night.
- A stronger Stop. If the scope refuses a stop, Nebulink tries again and still sends the other stop commands; a joystick move the scope refuses sends a Stop too.
New in 2.2.39
- Six new how-to videos. The How-to videos page has videos 28 to 33: Layouts, The Moon page, Weather history and the satellite photo, Polar alignment updates, Status bar, Wi-Fi and GMT, and Plans and pictures.
New in 2.2.38
- Weather history. The Weather page shows how the nights have been over the last 3 months to 3 years, from NASA's records: clear nights, night lows against the dew point, wind and rain, and the clearest month.
- Turn off after a Whiz plan. Nebulink Whiz's options include Turn off the scope when finished: after the last target the scope parks, then powers down (it comes back on only with its power button).
- Wi-Fi meter. The status bar shows each scope's Wi-Fi signal as bars, the menu's scope list shows them beside every scope, and the Overview has a graph of the last hour.
- Choose where photos and videos go. Change folder… under Save photo and Record video, on the Moon page and in Live view, saves them in any folder you pick. The Album lists that folder too.
- Stacking page layouts. Six ways to lay out the Stacking page: Side column, Portrait frame, Picture on top, Dashboard, Tabs and Theater. Pick one with the Layout buttons at the top.
- Satellite photo on the weather map. The weather map now shows the real-color satellite picture, by day and by night, with a Photo / Infrared switch.
- Alignment page layouts. Six ways to lay out the Alignment page: Two columns, Polar first, Three columns, Step by step, Summary tabs and Big readout. Pick one with the Layout buttons at the top.
- Live view layouts. Six ways to lay out Live view: Control rail, Cockpit, Portrait frame, Bottom dock, Tabs and Theater. Pick one with the Layout buttons at the top.
- Moon page layouts. Four ways to lay out the Moon page: Cockpit, Control rail, Tabs and Step by step. Slew to the Moon, Save photo and Record video sit right under the live picture.
- Moon page. Exposure and Gain sliders with an Automatic exposure tick box, and Freeze and label. Turn on camera uses the Seestar's Solar System mode at the Moon, and asks before moving the scope there. Center the Moon moves the scope until the Moon is in the middle of the picture. Zoomed in, Save photo keeps just the part you see. The crater positions come from the IAU's list.
- Weather page. A smaller map with the warnings beside it, Night by night higher up, and the map, Hour by hour and Weather history fold away when you click their titles.
- A smaller header and status bar. The page starts higher: the header stays on one row, and the scope's buttons sit beside the status. On a phone the status folds to one line; tap it for the rest. The ✦ Ask Nebulink button is round and shows its name when you point at it.
- GMT in the status bar. The time in GMT (UTC), the time astronomers log observations in. After midnight GMT the GMT day shows in front.
- Night mode. The weather map, the Moon page, the stacked picture, the video thumbnails and the selected buttons and tabs are red too.
- Very high targets. The Seestar won't go higher than about 84°, so a plan's target that high waits until it's lower (up to 45 minutes) instead of failing.
New in 2.2.37
- Next measurement. In Live adjust, a reading is taken when you press Next measurement, so you can turn the wedge and let go first. Tick Repeat readings automatically to have them repeat every 5 seconds.
- Measure here. One reading at the current position, without moving the arm.
- Status line. Shows whether a solve is running, when the next reading starts, and when the last result came in.
- A pause before each solve. The app waits 5 seconds before it starts a solve, so the wedge can be left alone. This includes the full three-point measurement.
- Bigger numbers, dial hidden. The error and the altitude and azimuth figures are larger. The dial stays hidden unless you press Show dial.
- Timing in the log. Each polar solve writes how long it took and its error to the app log, to help find slow alignments.
New in 2.2.36
- Moon page, redesigned. The Moon page is laid out as cards: the phases, live view, photos and video, the Moon in the sky, popular craters, the Moon map and annotate. It takes photos and video only and doesn't stack anything (see Moon photography).
- Enlarge the Moon in the sky. Click the Moon in the sky chart, or press Enter on it, to see it full size. Press Escape or Close to go back.
- Translations. The Moon page and the new messages are in German, French, Spanish and Chinese, and so is this manual.
- Moon page controls. Live view pans and zooms; an All craters list; the phase shows on the Moon map; exposure and gain set on the Moon page go to the scope (1-second subs for the Moon and planets by default); save Moon pictures as original or annotated copies; choose a lunar video from Windows' Open dialog.
- Solar System mode. The Moon and planets are shot in Solar System mode, so they aren't over-exposed.
- Enhance color. A color boost that eases off on noisy skies, and a separate slider for color blotches.
- Power off after a plan. When a plan finishes, the scope can power down after it is parked.
- Star chart while slewing. The chart redraws as the scope moves, so the field of view moves with it.
- Worldwide weather. An hourly forecast from MET Norway for any place. In Germany, DWD municipal warnings and DWD radar.
- Place search offline. Search places and find the nearest town from the GeoNames list, with no internet needed.
- Stacking messages. A message while the mount is still moving to the target; autofocus shows in live view; a clear message when clouds reject frames, as opposed to no frames at all.
- Worldwide weather forecast. An hourly forecast from MET Norway for any place, fetched by your PC.
- Weather warnings and radar for Germany. The Deutscher Wetterdienst's municipal warnings for the place, and its precipitation radar on the weather map.
Fixes in 2.2.36
- Windows guest access. The Album no longer has a button that changes Windows settings. If it can't reach your pictures, Troubleshooting gives the PowerShell steps to allow guest access yourself.
- Place search. When place search isn't working, Nebulink says so and suggests typing the latitude and longitude instead.
- Tidy-up. Removed unused code. Nothing you can see changes.
- Stacking during GoTo. Stacking no longer starts while the scope is still going to its target, which used to stop a stack starting during a GoTo to the Moon.
- Image edges. Image crops at the edge of the frame no longer fail.
- Moon page layout. The Moon page's headings, toolbars and spacing are now consistent.
New in 2.2.20
- Voice commands in the manual. A new Voice commands section lists everything you can say (or type) to the Helper: controlling the scope, moving around, shortcuts and quick questions.
- Moon page. A new Moon page under At the scope, with a list of popular craters, a quick snap and a Slew to the Moon button that centers the Moon. Photos and videos of the Moon are saved to your Pictures\Nebulink folder. The Moon page doesn't stack anything.
- Moon map and crater GoTo. The Moon page shows a NASA map of the near side beside the popular craters. Click a crater on the list or a dot on the map and Nebulink sends a GoTo to it (it asks first if a plan is running). Live view on the Moon page zooms in 1×, 2×, 4× or a custom zoom, and the page has Moon now and Moon in the sky cards (see Moon photography).
- A quit icon and a Help group. A power icon at the top of the page list quits Nebulink (Quit Nebulink at the bottom still works). Troubleshoot, Tutorial, How-to videos, Manual and About sit under a Help heading.
- Best targets without the Moon. The Planets category lists the planets only; the Moon has its own page.
- The Sky map follows the plan. While a plan runs, the Planner's Sky map & field of view now shows the target being imaged, with its planned framing, and moves on by itself when the next target starts. Each row in the queue keeps its ⌖ button while the plan runs, to look at any target's framing; that one stays on the map until the next target starts (see Planner).
- EQ mode stays EQ mode. At the end of a plan, and when the storm guard closes the arm, Nebulink used to park the Seestar in a way that also switched it from EQ back to Alt-Az mode, so the next night started in the wrong mode. Now a scope in EQ mode goes to its EQ home position and stays in EQ mode; a scope in Alt-Az folds its arm as before. Ask Nebulink's park does the same. Park & fold the arm on the Alignment page still switches to Alt-Az, and now says so first (see Alignment).
- A quicker horizon scan, with an honest time left. The time left under the progress bar now goes by how long the directions take, leaving out the first: that one starts with the long move down from the open-sky check and often climbs far, so the scan used to look three times longer than it was. Each move takes fewer nudges, and the scan counts bright stars too, so it tells sky from trees more surely. On a weak Wi-Fi the Seestar now and then drops the picture connection; the scan now tries again up to 3 times instead of stopping (if it still stops, Continue the scan carries on from that direction) (see Live view).
New in 2.2.19
- Safer on a shared Wi-Fi. Nebulink now takes only numbers where a Seestar reports numbers (battery, Wi-Fi signal, storage), so a device on the same network pretending to be a Seestar, at a star party say, can't slip anything into Nebulink's pages.
- Phone access, tightened. Phone access works on your home network only. From a phone, pictures are copied into Pictures\Nebulink or a folder already listed under Saved on this PC; the license, alert tests, sending logs to support, detailed logging and removing folders stay on the PC (see Settings).
- GraXpert found where programs are installed. Nebulink finds GraXpert by itself in Program Files. A copy in Downloads, on the Desktop or in Documents is filled in for you: press Find GraXpert to use it (see Enhance).
- Careful with backups and copies. Restoring a backup checks each file the way Nebulink checks what you type in, and a picture copied from the Seestar can only go into the folder you chose.
- Beta keys. A new beta key is checked online the first time it's entered, then works offline as before. Keys already in use keep working until their date.
- The horizon scan works on a real Seestar. While the camera is on with no target (the automatic horizon scan, and Turn on camera on Live view), the Seestar doesn't hand over its pictures the way it does while imaging, so the scan stopped at once with "No single frame came". Nebulink now asks the Seestar to stream its pictures, as the Seestar app does. After each move the scan waits for a picture taken once the arm has stopped, so each direction takes a little longer (see Live view).
New in 2.2.18
- Darks after a night's imaging. Build darks now used to fail with "function conflict" when the Seestar's camera was still on from the last target, which it is after Stop imaging. Nebulink now turns the camera off first and then starts the darks; nothing moves. When a build ends, the card now says whether the darks were built, stopped or not finished, instead of always "Darks built" (see Stacking).
- A banner while darks are building. A blue BUILDING DARKS banner under the header shows on every page while a Seestar builds darks, with how far it has got, the exposure and temperature, and when it started, because the Seestar can't image meanwhile. Watch it build opens the Dark library card on the Stacking page.
- Targets in the middle of the picture. The Seestar plate-solves after a GoTo but starts stacking even when the target landed well off-center (15′ on one tester's M31, a fifth of the picture), and the whole stack keeps that framing. Now, after every GoTo (plans, mosaic panels, GoTo this framing now and the Star chart's GoTo & start imaging), Nebulink reads where the picture's center really is from the Seestar's own plate solve and, if it's more than about 2′ off, aims again, up to twice. A re-aimed target starts a fresh stack; the frames from before stay as a short stack of their own. The plan log says how far off it was (see Planner).
- The Elephant's Trunk, centered. Elephant's Trunk now aims at the Trunk itself (IC 1396A). The big glowing cloud around it, IC 1396, is listed as Elephant's Trunk region; its position is the cluster in its middle, about half a degree from the Trunk.
New in 2.2.17
- Satellite trails taken out. Enhance now finds the straight streaks satellites and planes leave in a picture, marks them and takes them out, keeping the stars they cross. Untick one that isn't a trail, or press ✎ Mark a trail and click both ends of one it missed (see Enhance).
- No scope box while the arm is folded. A parked Seestar isn't looking at the sky, and different models report different, meaningless positions then. The Star chart and the Planner's map no longer draw its box until the arm is open, and the chart says Arm folded: not pointing at the sky (see Star chart).
- The tutorial in your language. Every step of the Tutorial is now in Deutsch, Français, Español and 中文; most steps used to stay in English. Manual in the page list now reads Handbuch in German and 手册 in Chinese (it said "manual" as in "not automatic").
New in 2.2.16
- The level at a glance. A Level item in the status bar, next to Mode, shows whether the Seestar is level: its spirit-level icon is green when it is, amber when it's nearly there and red when the tripod needs adjusting. In EQ mode it checks the wedge's tilt against your latitude instead. It follows the same rules as the Level dial on the Alignment page; click it to open that page (see Alignment).
- Plan in the morning for tonight. A plan made before noon now shows on the Planner's timeline over the coming night, starting when it gets dark, instead of over the night that has just ended with the targets starting in daylight. The Start the plan? box says when it will really begin, too (see Planner).
- Plan for a scope that's switched off. Nebulink now remembers each Seestar's model, field of view and mount mode (EQ or Alt-Az), so a scope that's off or out of reach still shows its model (not just its address), and Best targets, Whiz, the Planner and the Star chart use its own field of view and framing angle. The Planner says when it's using what the scope last reported (see Installation and first run).
New in 2.2.15
- Join the Nebulink community. A link on the About page (and one in this manual's Contact section) opens the Nebulink Discord server, where owners show their pictures, swap tips and say what Nebulink should do next.
- A phone icon in the header. The phone icon next to Night mode opens a small window with the pairing QR code and the 6-digit code, so you can pair a phone from any page without going to Settings. If phone access is off, it offers to turn it on.
- The mode at a glance. A Mode item with an icon in the status bar, between Activity and Tracking, says whether the Seestar is in Alt-Az mode or EQ mode, so you no longer need the Alignment page to check. Click it to open that page (Advanced view).
- The page list scrolls. On a short window the list of pages on the left now has a scroll bar, so every page, including Troubleshoot, Tutorial and About, can be reached without making the window taller.
New in 2.2.14
- The horizon scan carries on when you change pages. A blue HORIZON SCAN banner under the header shows how far it has got on every page, with a link back to Live view, and Live view picks it up again after you leave it or reload the page (see Live view).
- Continue the scan. If a scan stops part way, Continue the scan carries on from the next direction and keeps what was already measured, instead of starting over.
- A steadier scan. One missed answer from the Seestar over weak Wi-Fi no longer ends it: Nebulink asks again before giving up.
- Live view video says why it's blank. When Video shows nothing, as the wide-angle camera can on an S30 or S30 Pro (the Seestar only streams video in Landscape and Solar System modes), Nebulink now says so after a few seconds and suggests Single frame, instead of waiting for ever.
New in 2.2.13
- A plan takes over from polar alignment. If a polar alignment or its Live adjust is still running when a plan starts, or before any GoTo, Nebulink stops it first. Left running, it kept sending the Seestar back into its alignment routine, so a GoTo was canceled and nothing stacked.
- Live adjust switches itself off. After 20 minutes, or when no Nebulink page has been open for 5 minutes. A GoTo, Park, Open arm, filter change, autofocus or Start stack from the page also stops it (see Alignment).
- One Nebulink at a time. Starting Nebulink again while it is already running just opens the page that is already running, instead of starting a second copy that also talks to the Seestar.
- Dark library saves more reliably when Windows or a virus scanner has the file open for a moment, and steadier after a long time offline: a Seestar that stayed off for days no longer stops Nebulink checking on it.
New in 2.2.12
- Weather warnings on every page. A warning for the scope's place shows on the banner at the top of every page, and a severe one also goes to your phone (US only).
- Storm guard. A running plan stops, closes the arm and tells your phone when a storm warning or heavy rain on the radar comes near, and carries on after it passes (see Planner).
- Battery check. Before a plan starts, Nebulink says whether the Seestar's battery will last it, from that scope's own measured use (see Planner).
- Beginner and Advanced. A switch under the scope boxes shows just the essential pages, or every page (see Getting around).
- Observing lists. The Messier and Caldwell lists with what you've already imaged and what's up tonight, and a Messier Marathon planner (see Best targets).
- Labels on your pictures. In the Album's picture viewer, Labels names the galaxies, nebulae, clusters and bright stars in a stacked picture (see Album).
- Star party mode. The live picture full screen for visitors, with the object's name, distance, facts and a QR code (see Live view).
- Satellite passes. When the ISS, Tiangong and the brightest satellites cross your sky, and a warning when one is about to cross the scope's field (see Best targets).
New in 2.2.11
- Weather map. Satellite clouds and rain radar around your observing place, over the last hour, on the Weather page (see Weather).
- Weather warnings. The National Weather Service's watches, warnings and advisories for your place, in the US.
- Also worth knowing. Thunderstorms, rain or snow, fog, frost and strong gusts for tonight's dark hours, and what each means for the Seestar.
New in 2.2.10
- Dark library. Build the Seestar's own master darks from Nebulink, have it build them when a plan finishes, see which exposures and temperatures are covered, and copy the masterdarks to your PC (see Stacking).
- Steadier on weak Wi-Fi. A missed reply no longer switches off where the scope points or the stack count for the rest of the night; Nebulink simply asks again a little later.
- The right tip in the "stars getting soft" alert. The phone alert now suggests the dew heater only when it's off.
New in 2.2.9
- Tonight's sky sheet. One picture of the night for your club or a group chat: the best targets, the planets and the Moon, comets, darkness times and what's coming up. Save, copy or print it (see Best targets).
- Sky events. Meteor showers, the Moon passing planets, planets passing each other and Messier objects, new and full moons and bright comets in the next six weeks, worked out for your place, with a note on the ones that make a good Seestar picture (see Best targets).
- Focus and dew watch. While the Seestar stacks, Nebulink measures how sharp the stars are and warns you when they get soft, so you can refocus or turn on the dew heater (see Stacking).
- Automatic horizon scan. The Seestar steps round the sky by itself and finds where the stars appear above your trees and roofs, then saves that spot's horizon (see Live view).
- Night report. On the Analytics page, pick any night in the calendar (it opens on last evening) and save it as a PDF: each target's stats next to a thumbnail of its picture, the night at a glance and what happened. Print it or share it (see Analytics).
New in 2.2.8
- When should I shoot it? From a target's details, see its best nights over the next month, scored for darkness, height above your horizon, moonlight and the forecast (see Best targets).
- Add to calendar. Save tonight's plan, or a best night for a target, as a calendar event with a reminder at setup time (see Planner).
- AstroBin details. On the Analytics page, make the acquisition-details file AstroBin imports for a target: frames, exposure and date for each night (see Analytics).
New in 2.2.7
- A page menu for phones. On a phone or a narrow window, press ☰ Pages at the top of the screen to open the list of pages, then pick one. The bar stays at the top as you scroll.
- Your places. Save the places you image from in 📍 Set location (tick Save to my places as), then pick one with a tap next time. They're the same places as on the Weather page (see Installation and first run).
- Level on an EQ wedge. In EQ mode the Level dial on the Alignment page checks the wedge's tilt against your latitude, instead of asking you to level a tripod that's meant to be tilted (see Alignment).
New in 2.2.6
- Plan without a Seestar connected. 📍 Set location now works with no Seestar connected: it sets the place Nebulink plans for, and every planning page uses it. Before, the Planner and Star chart could fall back to a default place (see Installation and first run).
- Clearer message when a Seestar doesn't answer. Setting the location, and other commands, now say plainly when the scope isn't answering and what to check, instead of waiting with no message.
New in 2.2.5
- How-to videos in Nebulink. How-to videos in the page list plays the YouTube how-to series inside Nebulink, and the red ▶ at the top of most pages opens the video for that page (see Welcome).
- Live view keeps the picture in view. On a wide screen the picture stays put while you scroll the controls beside it, and Map your horizon now sits right under the movement speed, with Mark here next to the arrows (see Live view).
- Share picture captions single frames too. A single frame's caption now shows the target, exposure, filter and date, like a stack's.
New in 2.2.4
- Sort Best targets your way. Sort by Best score, Name (M1, M2, M3…), Direction (grouped North, East, South, West) or Earliest first. My scope can see shows only the targets on one side of the sky, timed and scored for that side (see Best targets).
- Observing spots. One place can now have several named spots, each with its own horizon, such as the north, south and west corners of a yard. Each Seestar remembers which spot it's at (see Settings).
- Map your horizon from Live view. Point the scope at the treetops and roofs and press Mark here; Nebulink draws the spot's horizon from your marks (see Live view).
- Thank you, beta testers. The About page now thanks everyone who tested Nebulink before release.
New in 2.2.3
- Beta keys. Beta testers can activate Nebulink with the beta key they were sent (it starts with NEBULINK-BETA): press the badge at the top, or Enter license key on the About page, paste it and press Activate. It works without internet until the date shown on the About page; after that, Nebulink asks for a license key from a purchase.
New and fixed in 2.2.2
- Saved on this PC shows any folder. Pictures copied into a folder other than Pictures › Nebulink can now be seen in the Album: that folder is added to the tab's Folder list by itself, and Choose a folder… shows any other one (see Album).
- More voice and typed commands for the Helper. Say or type a page name on its own (“Planner”, “Weather”) to open it, or “Open settings”, “Go back”, “Night mode on” / “off”, “Start the plan” (it opens the usual Start the plan? box, so nothing starts until you confirm) and “Close the helper”.
- Banners across the top. While the selected scope is imaging, a blue banner under the header scrolls what it is doing. A problem (autofocus failed, the plan stopped itself, a target skipped, the scope not answering, low battery or storage) flashes in red with what to do, until you dismiss it or start the plan again; clouds and a stack that ended early show in amber (see Getting around).
- The framing box follows the mount mode. The Planner, the live box and the Star chart now turn the field of view the way the camera really sits: in Alt-Az by the target's position and time, in EQ mode by the angle the scope measured. Before, every scope and mode was drawn at 0° (see Planner).
- The Star chart's field box stays a rectangle. For targets high in the sky it used to turn into a trapezoid, narrower at the top; it now keeps the camera's true shape everywhere, up to the zenith.
Fixed in 2.2.1
- Autofocus checked during a plan. When the Seestar's own autofocus fails after a GoTo, Nebulink focuses again; if that fails too, the plan stops instead of stacking out of focus, without parking (see Planner).
- Start autofocus while stacking. It now waits for the stack to end, then focuses. Before, the stack ended and the focus didn't start. During a plan, the same target carries on afterwards.
- No more racing to the end. If two targets in a row stop within a few minutes, the plan stops and leaves the scope where it is, instead of running through the rest of the plan and parking.
Earlier, in 2.1.1
- Themes. 🎨 now offers ten looks for the whole app: Nebulink, Bridge console, Mission control, Holo deck, Command bunker, Relic, Deep field, Flight deck, Fleet ops and Night watch (see Getting around).
- Troubleshoot. A new page with a check-up of your Seestar (connection, Wi-Fi, battery, storage, level, location, dew) with a fix for each problem, and Last night, explained: what happened during a night, target by target, and what to do about anything that went wrong (see Troubleshooting).
- Quick start. A new first page for beginners: one button images the best thing in the sky, four tiles check the scope, darkness, cloud and dew, and tonight's top 3 targets each have an Image it button (see Quick start).
- Analytics. A new page with your imaging history: imaging time night by night, targets finished and skipped, frames stacked, every target you've imaged, the latest pictures from the Seestar's album, records, problems along the way, and Export CSV (see Analytics).
- Show on star chart everywhere. Every card on Best targets (deep-sky, comets and planets) has Show on star chart; ✕ Close chart takes you back to the same place.
- Ask out loud. Press 🎤 in Ask Nebulink and say your question; it stops listening when you pause. The speech is recognized on this PC, with no internet, and 🔈 reads the answers aloud (see Nebulink Helper).
- Fixes. The Tutorial no longer leaves a target window open when you press Next quickly; the Seestar Edition badge stays readable in every theme.
Earlier, in 2.1.0
- Tutorial. Tutorial in the page list walks you through Nebulink one part at a time, in about 20 short steps (see Welcome).
- Planner timeline. A Gantt-style timeline under the queue shows the night's darkness and each target's height in the sky. Drag a bar's edge to image longer or shorter, drag it past another to change the order, or drag it later to make it wait (see Planner).
- Copy to PC and free up space. In the Album, Select pictures or whole folders and Copy to PC, with progress and Stop; optionally delete them from the Seestar once each file is safely copied. The Album shows the scope's free space (see Album).
- Zoom to the corners. Live view and Stacking zoom with the mouse wheel or buttons, with jumps to the four corners and the center at the camera's full resolution, to check star shapes (see Stacking).
- Star reduction. A new slider in Enhance shrinks and dims stars so nebulae and galaxies stand out (see Enhance).
- Save as PNG or TIFF, 8 or 16-bit. Enhance lets you choose the file type and name, and Save as… opens Windows' Save as window (see Enhance).
- Imaging indicator on every page. A red box above the page list shows what each scope is imaging, with the frame count; click it to watch. The browser tab's title shows it too.
- You decide when a plan starts. A new Wait for darkness tick box: untick it and the plan starts exactly when you say, even in twilight. The queue and the Start confirmation show the real start time, and Stop at dawn reacts only to the morning sky.
- Polar alignment like the Seestar app. The result now says which way to move the wedge: ⬆ Up / ⬇ Down with the altitude knob and ⬅ Left / ➡ Right with the azimuth knobs, with better/worse for each during Live adjust, and Flip buttons if a direction is reversed (see Alignment).
- Plans don't skip a target after one timeout. A GoTo or filter change that times out is tried again up to three times before the plan moves on.
- Fixes. The Weather page no longer lists tonight twice; the Planner's "Added … as number" note follows when you reorder; Ask Nebulink knows the new features and answers What's new?
Earlier, in 2.0.1
- Nebulink Helper. The ✦ Ask Nebulink button on every page answers how-to questions from this manual, checks your scopes and the log when something isn't working, and does things for you, like turning on the dew heater, after asking first. It works offline (see Nebulink Helper).
- Send log to support. On the About page, send your log and a short note straight to Nebulink's developer, with no file to attach. Passwords and keys are removed first (see Troubleshooting).
- AI processing in Enhance. Remove gradients, remove noise and sharpen with GraXpert, a free program you install separately, or use the built-in clean-up without it (see Enhance).
- Dew heater switch in Nebulink Whiz. The Ready step's checklist turns the dew heater on or off and sets its power before the plan starts.
- Alignment for every scope. The Alignment page has a Seestar switcher, so the S30 Pro shows its own level, mount mode and EQ readings (see Alignment).
- Steadier with two scopes. Each scope now has its own connection, so one that's slow to answer no longer holds up the other. Short gaps show an amber Reconnecting…; the red banner appears only after 45 seconds without an answer.
- FITS files open reliably in the Album. Files come from the scope in pieces, and a Wi-Fi drop resumes the download instead of starting over.
- Let Whiz pick again gives a different good mix of targets each time, and says how many changed.
- Planner times stay put. The running target's end time and minutes left no longer move after a refresh.
- Clearer Live view for the wide-angle camera. Stacked is greyed out for Wide-angle, and the messages explain why there's no picture while the telescope camera is imaging.
Earlier, in 1.4.4
- Turn on camera: live video without imaging (preview). Live view has a Turn on camera button. It starts the Seestar's own live view: the camera runs, but nothing moves and nothing is stacked or saved. Nebulink switches to Video by itself and shows the scope's live video stream, the same one other Seestar apps use. Turn off camera stops it (see Live view).
- Live video during polar alignment. While the scope measures or re-measures the polar error, the Alignment page shows the telescope's live video instead of a picture every few seconds. If there's no video, it falls back to the latest frame (see Alignment).
- Video works in stargazing mode. Earlier versions said video only works in Landscape and Solar System modes. That was too strict: the Seestar streams video whenever its camera is running. When the camera is off, Live view now says so and offers Turn on camera.
Earlier, in 1.4.3
- Live stack in the installed app. The installed Nebulink could fail to show the live stack and current picture (“No module named PIL” in the log). Fixed. Support logs are also shorter: the scope’s full replies are only written with detailed logging.
- Polar alignment (preview). On the Alignment page, with the scope in EQ mode on a wedge, Measure polar error runs the Seestar's three-point measurement and shows how far off the pole the mount is. Live adjust then re-measures every few seconds while you turn the wedge's knobs, so you can watch the error shrink (see Alignment).
- Best targets is the same on every Seestar. The ranking no longer changes with the selected scope's field of view, so an S30, S50 and S50 Pro show the same list. Each card still notes how the target fits the selected scope's field (see Best targets).
- Enhance opens faster. A FITS you open in the Album is fetched once and reused, so Enhance no longer downloads it from the scope a second time, and opening Enhance again on the same picture is instant (see Enhance).
- Clearer Live view. When the scope isn't imaging, Live view now says so and tells you how to start (pick a target and press GoTo, or start a plan), instead of reporting a missing stack (see Live view).
- Safer support logs. Wi-Fi and Seestar hotspot passwords are never written to the log or to a saved support file.
- Plans started before dark wait for darkness. Starting a plan in the afternoon or evening no longer ends it at once with "Dawn is breaking" and parks the scope: it waits until the sky is dark, then begins. A plan only stops for dawn after it has imaged that night, and the scope is parked at the end only if something was imaged (see Planner).
- Faster live stack. The stacked picture now arrives in seconds instead of minutes, and updates as each new frame is stacked (see Stacking).
- Plans carry on after a restart. If Nebulink is closed or restarted while a plan runs, it picks the plan up again when it starts (see Planner).
- Arm, reboot and dew heater controls. Open arm / Close arm and ⟳ Reboot in the status bar, an option to close the arm when you stop imaging, and a dew heater switch with a power setting on the Overview (see Getting around and Overview).
- Quicker Stop. Stop, Stop imaging and the move arrows go straight to the scope, even when the other scope's connection is slow.
- Switch scopes on every page. Nebulink Whiz, Planner, Live view, Stacking and Album have a Seestar switcher at the top.
- Location in the status bar, shown as a town or saved place name.
- Crop in Enhance, with common shapes such as 16:9 and 4:5 (see Enhance).
- A faster Album: folders you've opened load instantly.
- Clearer status. The Current target card says Not imaging when the scope is idle or only showing its live preview, and an open Nebulink page tells you when Nebulink has been updated.
- Works with newer Seestar firmware, which reports the stack count differently and closes idle connections.
Installation and first run
Setup takes a few minutes and is done once.
- Double-click Nebulink-Setup.exe. If Windows shows Windows protected your PC, click More info, then Run anyway.
- Click through the installer. Tick Create a desktop shortcut if you'd like one, and leave Start Nebulink now ticked at the end.
- Nebulink opens in your web browser at http://127.0.0.1:8050. There's no separate window: the page is the app.
- Connect Nebulink to your Seestar. The first time, a card at the top of the Overview page asks for the official Seestar Android app file (an .apk or .xapk; you don't need an Android phone). Seestar firmware only takes commands from apps that hold ZWO's connection key, and Nebulink reads that key from this file, on your PC. Get it from ZWO's Seestar app download page (the Google Drive download next to the Seestar Android app, then Download in Google Drive), press Choose the Seestar app file, and pick it. The key is saved to
C:\Users\<you>\.seestarpy\seestar.pem; keep it private. - Close the Seestar app on your phone. Nebulink searches your network and adds every Seestar it finds, and remembers them for next time.
Starting and quitting. Open Nebulink from the Start menu or the desktop icon. To close it, press the power icon at the top right, beside Night mode, or Quit Nebulink at the bottom of the page list; closing the browser tab alone leaves it running in the background (which is what lets a plan run overnight). Opening Nebulink while it's already running just brings the page back.
Try it without a telescope: open Nebulink (demo mode) from the Start menu to explore every page with simulated scopes.
Where your files go. Photos and videos you save are in your Pictures\Nebulink folder. Settings (saved scopes, places, plans) are in %LOCALAPPDATA%\Nebulink, along with nebulink.log, which is useful if something goes wrong. Both stay if you uninstall.
Trial and license
Nebulink runs free, with every feature, for 14 days from the first time you open it. The badge in the header shows the days left. Demo mode is always free.
Activating. After buying, press the header badge (or Enter license key on the About page), paste the key from your purchase email and press Activate. Nebulink checks it online once; after that it works offline, rechecking about once a day when the PC is online. It keeps working for 30 days without internet, so nights at a dark-sky site are fine.
Two PCs per key. Each key can be active on two computers. Moving to a new PC? On the old one, open About and press Deactivate this PC to free its place.
Updates. Your purchase includes a year of updates; the About page shows Updates until. After that, the version you have keeps working forever. A newer version released after your date asks you to Renew updates: another year of updates costs $20. Buy it, then press Enter renewal key on the About page (or the header badge) and paste the renewal key from that purchase email; enter it on each of your PCs. Or keep using the version you had.
Updating and uninstalling. To update, run the new Setup file; it replaces the old version and keeps your settings. If a Nebulink page was already open in your browser, a banner at the top says Nebulink has been updated: press Reload now to see the new version. To uninstall, use Windows Settings → Apps → Installed apps → Nebulink → Uninstall.
Running from the source files (advanced). With Python 3.9 or later: unzip nebulink.zip, run pip install seestarpy opencv-python numpy pysmb in that folder, then python app.py. Add addresses to skip the search (python app.py 192.168.1.85) or --demo for simulated scopes. Saved photos then go to the captures folder next to app.py.
Finding your Seestars
The Find my Seestars button is on the Overview page, inside the My telescope card, below the Firmware, System, CPU temp and Wi-Fi boxes. Use it to add a new scope, or to find one whose address has changed.
Press Find my Seestars. Nebulink searches the PC's network for a few seconds and lists every scope it finds, with its model and address; press Add next to the one you want. If a scope's address has changed since last time, the list says where it used to be, and adding it replaces the old entry. If the search can't find a scope you know is on, open Or type its address, enter the address from the Seestar app or your router, and press Connect.
Setting the scope's location. The Seestar needs to know where it is to find targets and track the sky, and Nebulink uses the same spot for tonight's targets, darkness times and the forecast. The My telescope card shows the location the scope has. The Seestar app sets it from your phone's GPS; to set it from your PC instead (for example at a dark site without your phone), press 📍 Set location. Choose Use this PC's location, one of your saved places, a town or dark-sky site you search for, or type the latitude and longitude (west and south are negative: Hazleton is 40.96, -75.97). Press Set location; Nebulink reads the location back from the scope and shows a tick once it has changed. It can't be changed while the scope is stacking or running a plan, and Nebulink asks first if the new spot is far from the old one.
Planning without a Seestar. With no Seestar connected, 📍 Set location sets the place Nebulink plans for instead: pick this PC's location, a town or the numbers, and press Set location. It's saved on this PC, and Best targets, Nebulink Whiz, the Planner, the Star chart and the Weather page all use it, so you can plan a night before you set up. Under the scope's card it reads Planning for …. When a Seestar is connected, its own location is used; set it again then to send the place to the scope. If a Seestar doesn't answer, the place is still saved for planning. A scope you've added before but that's switched off now is planned with what it last reported: its model, field of view and mount mode (EQ or Alt-Az). The Planner's framing note says so, with the date, and the scope's button at the top of each page says offline (before, it could say connecting… for as long as the scope stayed off).
Your places. Save the spots you image from so you never type them again. When you pick a new place in 📍 Set location (this PC's location, a search result or typed numbers), tick Save to my places as and give it a name, such as Home or Beach. Next time it's at the top of the window under Your places: tap it, then press Set location. Press × next to a place to remove it. These are the same places as on the Weather page, up to 50, and they're kept in your backup.
Removing an old scope. Every scope button at the top of the My telescope card has a small × next to it. Press it and confirm to remove that scope from Nebulink. A scope Nebulink can't reach shows offline on its button; when it's selected you can also press Forget this scope. Nothing on the scope itself changes, and you can add it again with Find my Seestars.
Each scope you add is remembered, so Nebulink connects to it every time it starts. The search works when the PC and the scope are on the same home network, and also when the PC is joined to the scope's own Wi-Fi hotspot. Windows may ask whether Python can use the network the first time; allow it on private networks.
Quick start
Beginner view. With Beginner on (the switch under the scope boxes), Quick start is laid out for a first night: a status line for your Seestar (ready, imaging or offline), four big buttons, and tonight's top three below them. See tonight's best scrolls down to the three; Pick something to look at opens Best targets; Check my telescope opens the Overview with your Seestar; Stop appears only while something is imaging. The tiles, steps and sky line are hidden in Beginner and show in Advanced.
Quick start, at the top of the page list, is the quickest way to a first picture. Nebulink opens it by itself the first time it starts; after that it's one click away.
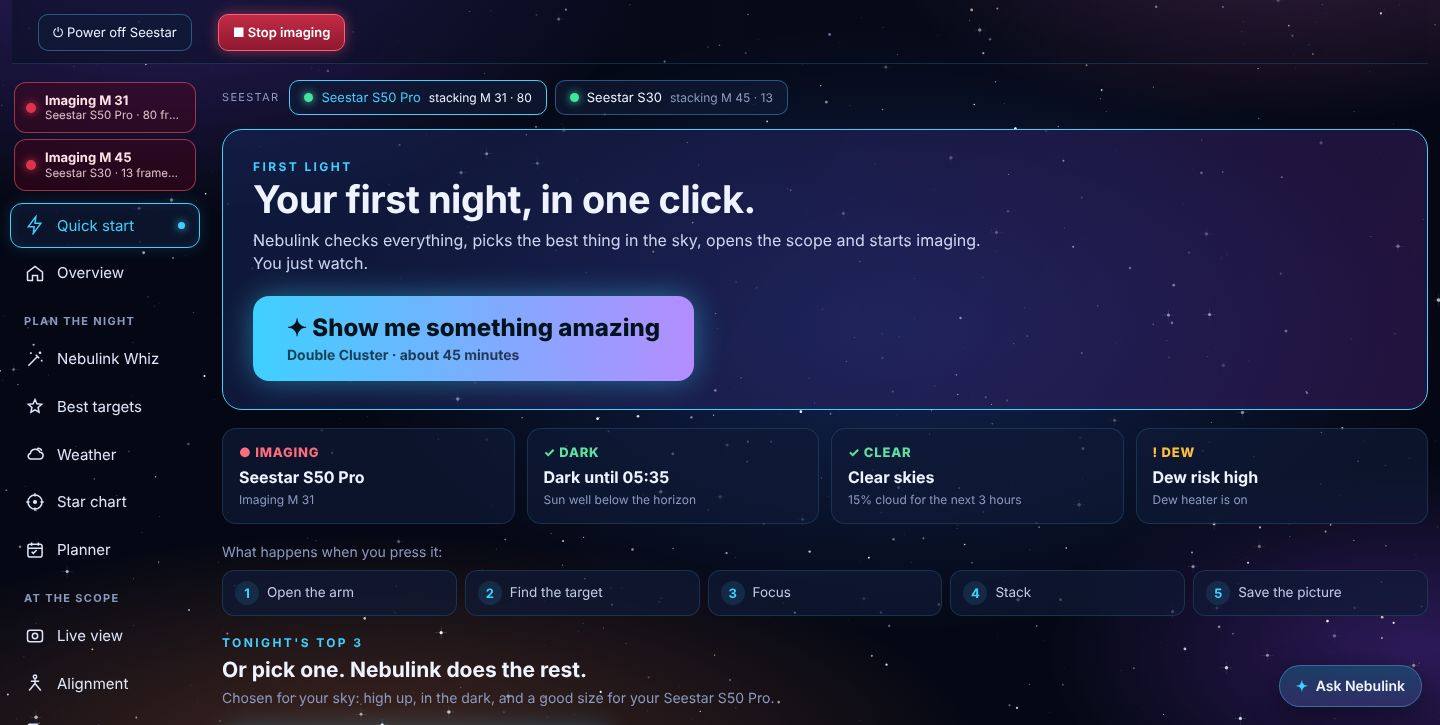
- Show me something amazing. The big button images tonight's best target: the one that ranks highest for your sky right now (high up, in the dark, a good size for your scope, famous and bright first). Under the button you see which target and for how long.
- The four tiles. Scope: connected and battery, or what it's doing. Dark: dark now and until when, or when darkness starts. Cloud: the forecast for the next three dark hours. Dew: tonight's dew risk; when it's moderate or high and the heater is off, Nebulink turns the dew heater on when you start.
- Tonight's top 3. Three targets in different parts of the sky, each with a sky photo, a line on what it is, its type, how high it gets, and whether it's easy. Press Image it on any of them. Emission nebulae get the light-pollution filter automatically.
- What happens. Nebulink asks first (the scope opens its arm and turns, so make sure nothing is in its way), then saves a one-target plan and starts it: it waits for darkness and for the target to climb high enough if needed, opens the arm, finds the target, focuses, stacks (up to an hour) and parks when done. The steps light up as it goes, with a progress bar, Watch it build, Live view and Stop. When it's finished, Open the Album shows the picture.
- Good to know. Starting from Quick start replaces the Planner's targets (it asks first if there are any) and stops a plan or stack that's running. Because it is a normal plan, it carries on if you close and reopen Nebulink, and you can see it on the Planner page. For a whole night of targets, use Nebulink Whiz.
Nebulink Whiz
Nebulink Whiz builds a whole night's plan in five short steps. Open it from Nebulink Whiz at the top of Plan the night.
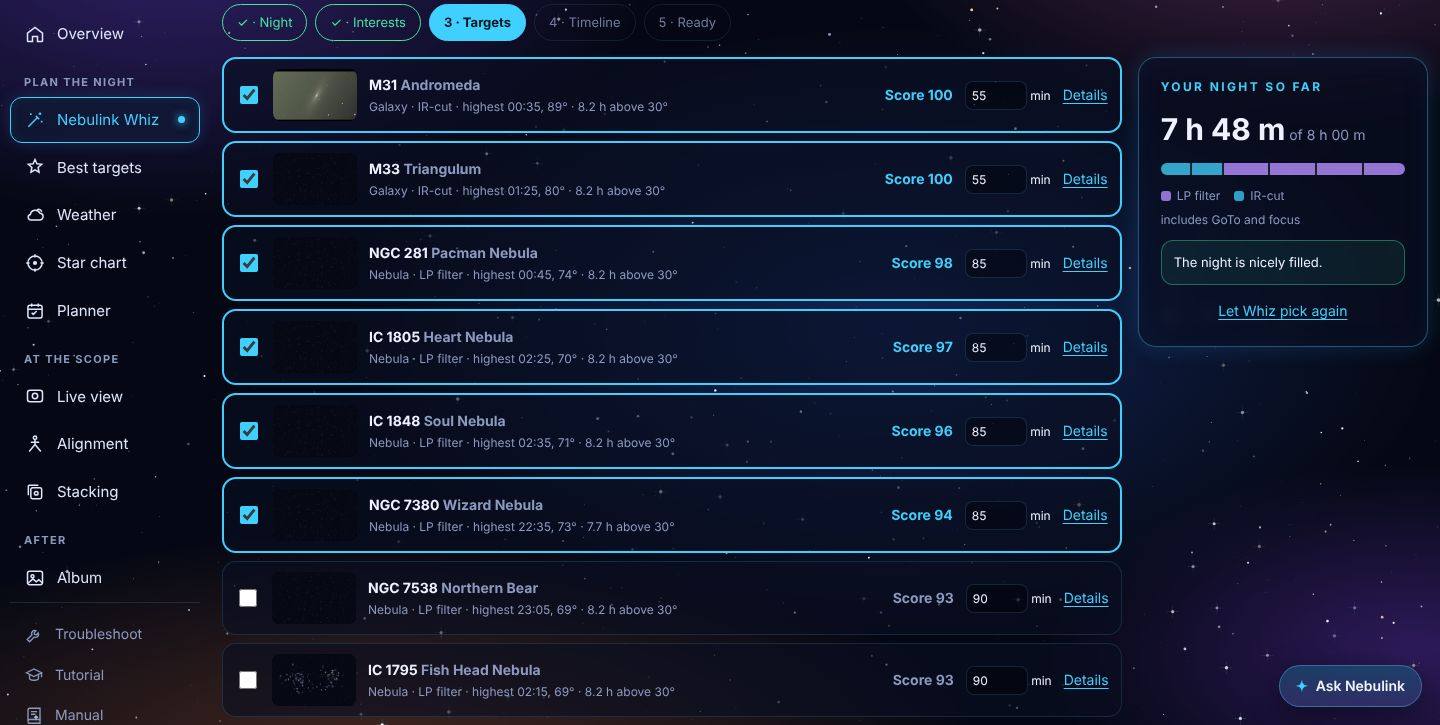
- Night. Pick the night (each one shows its cloud forecast; Whiz suggests the clearest, darkest one), which Seestar to use, and how long it can run: until a bedtime you choose, half the night, or all night until dawn. Under How long can it run?, Exposure per frame sets how long each frame is (10 to 30 s in Alt-Az; up to 90 s in EQ mode).
- Interests. Choose the kinds of targets you like (galaxies, nebulae, planetary nebulae, star clusters, comets), whether to stick to famous showpieces, and how to fill the night: fewer targets with long exposures, a balanced mix, or a quick tour of many.
- Targets. Whiz ticks the best mix for your time and shares the hours out between them. Untick or add targets, change the minutes, or press Details for a target's picture and height chart. The bar shows how much of the night is used and suggests a target for any spare time.
- Timeline. Whiz puts each target where it's highest in the sky and checks every slot: too low, past your end time, or close to a bright Moon. Turn off automatic order to arrange them yourself with the arrows.
- Ready. A checklist (scope connected, battery, storage, phone app closed) with a Dew heater switch: turn the heater on or off and set its power right there, before the plan starts (the same setting as the Overview's Dew heater row). Then choose to start automatically when it gets dark, start right now, or just save the plan to the Planner. If the Planner already has targets, Whiz asks before replacing them.
A plan scheduled for a later night waits until then, so keep the PC on and Nebulink open. You can still change anything on the Planner page afterwards (stop the waiting plan first).
Getting around
Every page shares the same frame: the header and status bar across the top, the page list on the left, and the copyright line at the bottom.
Banners. While any scope is imaging, or getting ready with a GoTo, plate solve and focus, a blue banner under the header scrolls what each scope is doing: its target, frames and time, and how long it stays dark. Watch it build → opens Stacking. When something goes wrong, a red banner flashes above it with the scope's name, what happened and what to do, and a button to the page that fixes it; amber is for a note that sorts itself out (clouds pausing the plan, a stack that ended early). Press ✕ to dismiss one; starting the plan again clears that scope's, and "Seestar not answering" goes by itself when the scope answers again. Hover over a banner to stop it scrolling. If Windows is set to reduce animation, the banners stay still and the red one doesn't flash. The banners show whether or not phone alerts are switched on.
What the scopes are doing, on every page. While a scope is imaging, a red box with a pulsing dot sits above the page list: Imaging M 31, with the frame count and how long it has stacked (one box per scope). An amber box means a GoTo, plate solve or focus is under way, and a blue one that a plan is waiting to start. Click a box to switch to that scope and watch it. On a narrow window the boxes sit at the bottom left. The browser tab's title shows it too (● M 31 · 42 · Nebulink), so you can see it with Nebulink in the background, and the status bar's Activity turns red while stacking.
Header. Shows a greeting, when full darkness starts or ends tonight, the time, the language list (English, Deutsch, Français, Español, 中文) and three buttons: 🎨 (background), °F/°C (temperature unit) and Night mode. Nebulink starts in your PC's language when it's one of those, and remembers the one you pick. Pages, buttons, messages and dates all switch; this manual is in English for now. Night mode turns the whole app dim red so your eyes stay adapted to the dark; press it again to switch back.
Theme. Press 🎨 and pick a Theme to change the look of every page: Nebulink (the original), Bridge console (navy and amber with a terminal font), Mission control (graph paper and instrument green, the easiest to read in daylight) Holo deck (glowing outlines on black), Command bunker (olive and gunmetal with amber lights), Relic (dark stone and bronze with glowing symbols), Deep field (black with tiny stars and thin gold lines), Flight deck (steel grey with hazard stripes), Fleet ops (brushed gunmetal with red status lights) or Night watch (charcoal with dim green readouts, gentle on the eyes without going fully red). It shows straight away and is remembered. Night mode always switches to dim red, whatever the theme; press it again and your theme comes back. Back to the original returns to the Nebulink theme.
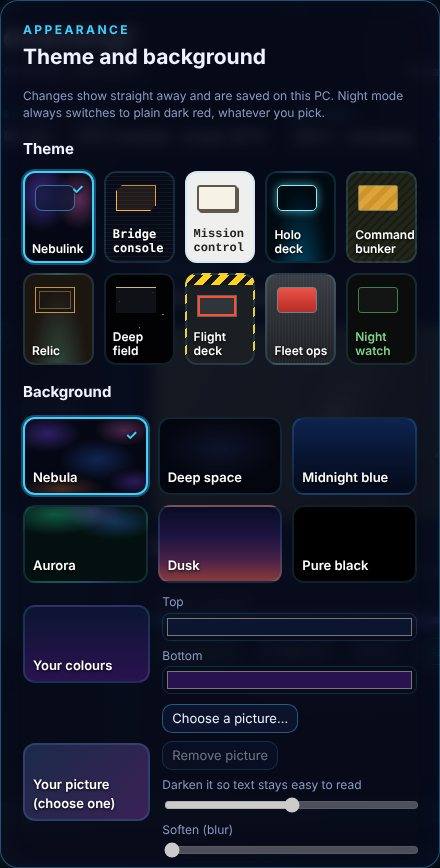
Background. Press 🎨 to change what's behind the pages (every theme except Nebulink and Holo deck has its own). Pick one of six backgrounds (Nebula, Deep space, Midnight blue, Aurora, Dusk or Pure black), choose Your colors and set a top and bottom color, or choose Your picture to use one of your own photos (JPEG, PNG or WebP; large photos are shrunk to screen size). For a picture, Darken keeps the text easy to read and Soften blurs it. Twinkling stars turns the star layer on or off. Changes show straight away and are remembered; Back to the original restores the Nebula background. Night mode always uses plain dark red, whatever you've picked.
Status bar. Always shows the selected scope at a glance:

| Item | What it tells you |
|---|---|
| Seestar | The model, such as S50 Pro |
| Connection | Green dot = connected, red = unreachable, plus its address |
| Wi-Fi | The scope's Wi-Fi signal, as bars and in dBm: four or three green bars from −60 dBm up (good), two amber from −70 (fair), one orange below that (weak) and one red below −80 (very weak). With a weak signal the live video freezes and commands time out; move the scope or the router closer. Point at it for advice, or click it to see the last hour on the Overview. The same bars show beside each scope at the top of the menu. |
| Activity | Stacking, GoTo, Slewing, Focusing, Live preview, Parked or Idle, and the target. Live preview means the camera is running but the scope isn't imaging anything. |
| Mode | Whether the Seestar is in Alt-Az mode (an icon of two crossing axes) or equatorial (EQ) mode (a tilted axis through a ring), the same as Mode on the Alignment page. Click it to open the Alignment page. It shows — until the scope has said which. Hidden in Beginner. |
| Level | Whether the Seestar's base is level, by the same rules as the Level dial on the Alignment page: a spirit-level icon in green (Fine, within 1° of level), amber (Almost, within 3°) or red (Tilted). In EQ mode it checks the wedge's tilt against your latitude instead: green within 2°, amber within 5°, red Check wedge. It doesn't measure polar alignment. Click it to open the Alignment page. It updates about every 30 seconds (every second while the Alignment page is open) and shows — until the scope sends a reading. Shown in Beginner too. |
| Tracking | Whether the mount is following the sky |
| Filter | IR-cut or LP |
| Temp | Outside air temperature and the scope's own temperature, in °F or °C (the °F/°C button beside Night mode switches every temperature in Nebulink) |
| Battery | Charge level, and whether it's charging |
| Location | Where the scope thinks it is: the name of a saved place within 3 km, otherwise the nearest town (looked up online), or the coordinates when the PC is offline. Hover to see the coordinates; click to change the location. |
| GMT | The time in GMT (UTC), the time astronomers log observations in. When it's already the next day in GMT, the day is shown in front of the time, and the tooltip gives the date. |
Four buttons sit at the right of the status bar, on every page.
- ⤒ Open arm / ⤓ Close arm raises the folded arm, ready for a GoTo, or folds it down to its parked position (the EQ home position in EQ mode). Closing asks first. The button shows Arm moving… until the scope reports the arm has arrived.
- ⟳ Reboot restarts the scope after a confirmation. With Put the scope in its home position first ticked (the default), Nebulink stops any plan or stack, waits for the stack to be saved, folds the arm home, then reboots. The button shows Going home…, Rebooting… and Restarting…, and Nebulink reconnects by itself when the scope is back, usually in about 2 minutes.
- ⏻ Power off shuts the scope down after a confirmation. Once off, it can only be turned on again with its power button.
- Stop changes with what the scope is doing. While it's stacking, focusing or running a plan it turns red and reads Stop imaging: press it and confirm to end the stack and the plan at once. Tick Then close the arm in the confirmation (Nebulink remembers your choice) to fold the arm once the scope has saved the stack. The button reads Stopping… until the scope confirms. The frames stacked so far are kept, and unfinished targets stay in the plan so you can start it again from the Planner. While the scope is slewing it reads Stop GoTo, and otherwise Stop halts any movement at once.
Stop, Stop imaging, Close arm and the move arrows go straight to the scope over its own connection, so they work at once even while the other scope is answering slowly.
On a phone the status bar folds to one line: the Seestar, what it's doing and its battery, with Stop beside it while something can be stopped. Tap the line to see everything and all four buttons; Nebulink remembers whether you left it open.
Pages. The page list follows a night out. Overview sits at the top. Plan the night holds Nebulink Whiz, Best targets, Weather, Star chart and Planner. At the scope holds Live view, Alignment and Stacking. After holds the Album and Analytics. Manual and About sit at the bottom. If you have more than one scope, pick which one you're working with on the Overview page, or with the Seestar switcher at the top of Nebulink Whiz, Planner, Live view, Stacking and Album. Each button there shows the scope's status (for example stacking M 31 · 83). Every page follows that choice.
Beginner and Advanced. The switch under the scope boxes on the left sets how much Nebulink shows. Beginner keeps the essentials for planning a night, imaging and looking at your pictures: the Star chart, Live view, Alignment, Analytics, Moon, Planets and Planet stacker pages, Quick start (the first launch opens the Overview instead), the Help and settings links (under one button), the status bar's arm, reboot and power buttons, the more technical rows on the Overview, and its Sun & Moon, Seestar storage and log cards are hidden, and a note at the bottom of the page list says so. Advanced shows every page and every setting. Nothing is switched off in Beginner: plans, alerts and everything else keep working, and you can switch back at any time. New users start in Beginner; if you used Nebulink before this version, it starts in Advanced.
Overview
The Overview page answers "how is the scope doing, and how is tonight looking?" on one screen. It refreshes every couple of seconds.
In Beginner, the Overview shows only the telescope you've selected and opens with Start here, three steps: Connect your Seestar scrolls to My telescope, Choose tonight's target opens Best targets, and Start the session opens the Planner. The setup checklist is hidden on this page in both views.
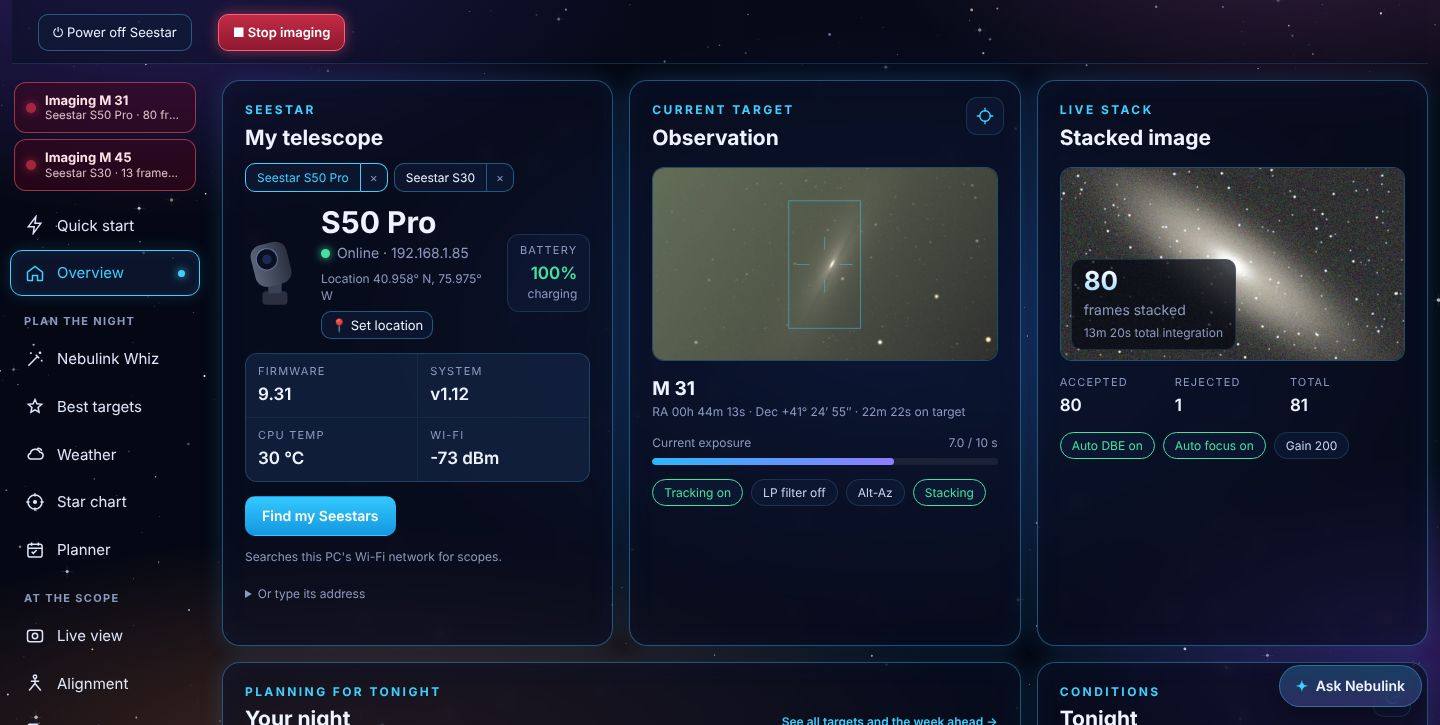
| Card | What it shows |
|---|---|
| My telescope | Model, online status, battery, firmware, temperature and Wi-Fi signal. Buttons switch between scopes. Find my Seestars searches the network for scopes to add (see Finding your Seestars). |
| Current target | A sky survey photo of the target the scope is working on, zoomed to fit the selected scope, with a box showing its field of view (an S30 Pro sees a much wider patch of sky than an S50 Pro), plus exposure progress, tracking, filter and mode. It changes as soon as you pick another scope. When the scope isn't imaging (idle, parked, or only running its live preview) it says Not imaging and names the last target. |
| Live stack | The stacked picture as it builds, updated as each new frame is stacked, with frames accepted and rejected, total exposure time, Auto DBE and autofocus. |
| Your night | The six best showpiece targets from your location tonight, ranked by hours above 30° in full darkness. The one you're imaging is highlighted. See all targets and the week ahead opens the Best targets page. |
| Conditions | An hour-by-hour cloud chart from 6 pm to 6 am, the best clear window, temperature, wind, humidity and dew risk, and the Dew heater switch (see below). |
| Sun & Moon | When astronomical darkness starts and ends, the moon's phase, and moonrise and moonset. |
| Storage | Free space on the scope. When it's getting full, copy pictures to this PC and delete them from the Seestar with Select and Copy to PC in the Album. |
| Live events | The scope's own status messages; click the heading to expand. |
The forecast and sky photos need internet on the PC. Press the refresh button on the Conditions card to reload the forecast. For the full forecast and the week ahead, open the Weather page.
Dew heater. The Dew heater row in the Conditions card shows whether the selected scope's heater is on, with a Turn on / Turn off button. While it's on, Heater power sets its strength from 10% to 100%; Nebulink remembers the power for each scope. When tonight's dew risk is high and the heater is off, a note suggests turning it on. The heater uses more battery. It's the same setting as the Seestar app's, so both show the same state.
Best targets
Pictures that don't load. A card whose sky picture can't be fetched shows a blank with a Retry picture button. Above the grid, Refresh pictures asks again for every blank card, and Clear sky-picture cache deletes the pictures saved on this PC so they're fetched again. When a picture source is down, a line above the grid says which one, for example "Pictures: CDS down, using STScI". The Connection page's Sky picture sources panel shows each source's last result.
The Best targets page (under Plan the night) ranks about 1,600 deep-sky targets for the night ahead (every Messier object, the brighter NGC and IC galaxies, nebulae and clusters, the Sharpless nebulae, and named dark and reflection nebulae), so you know what's worth imaging before you set up. Use the category buttons (Messier, Comets, Planets, Galaxies, Nebulae, Planetary nebulae, Open clusters, Globular clusters) to narrow the list; each shows how many are up that night. The best 12 show first; press Show more to keep going down the list, or type a name in Find a target. Famous showpieces rank a little ahead of fainter, lesser-known objects.
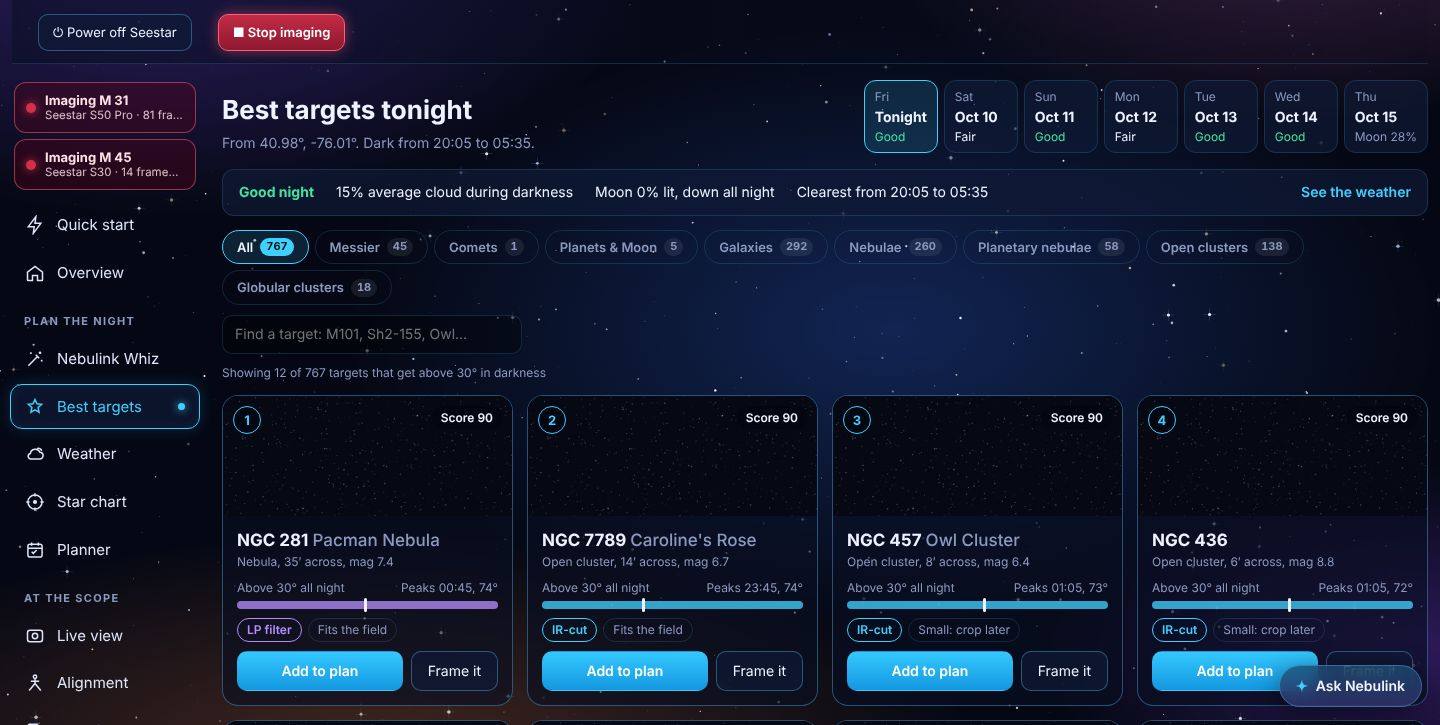
Show on star chart. Every card (deep-sky targets, comets and planets) has Show on star chart, which opens the Star chart on that object with its details and the GoTo button. Press ✕ Close chart at the top right of the chart (or Esc) to come back to Best targets at the same place in the list.
Target details. Click a target's picture or name to open its details: a larger sky survey picture with your scope's field of view drawn on it, its magnitude, size, position, filter and suggested imaging time, and a chart of its height through the night. The chart shades twilight and full darkness, shows the Moon as a dashed line and the cloud forecast underneath, and marks the 30° imaging height and the Seestar's 15° limit. Hover over the chart (or tap it) to read the time, height, Moon and cloud at any moment. From there you can add it to the plan, frame it, or show it on the star chart. Press Esc or ✕ to close.
Comets. The Comets button lists comets forecast brighter than magnitude 13 that get above 30° in darkness that night. Nebulink downloads the Minor Planet Center's comet list (updated daily) when the PC is online, keeps a copy for nights without internet, and works out each comet's position and expected brightness. Each card shows how far the comet moves per hour. Comet brightness forecasts are often off by a magnitude or two, and comets move against the stars, so Nebulink suggests shorter stacks (30 minutes) and re-aims at the comet's current position when its turn in a plan comes.
Planets. This category shows when each planet is above 15° after dusk and how bright and how big it is, so you can plan a planetary night. The Moon is on its own page (under At the scope). Show on star chart finds it on the chart. Nebulink's GoTo and plans are made for deep-sky stacking, so photograph the Moon and planets with the Seestar app's Solar System mode. The Sun is never listed.
- Night picker. The chips across the top cover the next seven nights, each rated Good, Fair or Poor from the cloud forecast. Pick one to see its best targets.
- Conditions. The strip below shows the night's rating, average cloud during darkness, the Moon's phase and rise or set time, and the clearest spell.
- Sort and direction. Sort by puts the cards in order of Best score, Name (M1, M2, M3…), Direction (grouped North, East, South, West, by where each target spends most of its time above 30° in darkness) or Earliest first. My scope can see is for a spot where part of the sky is blocked: pick North, East, South or West and only targets on that side of the sky are shown, each with the hours it's there and a score counting only that time. Nebulink remembers both choices. To block part of the sky for good, draw your horizon on the Settings page.
- Target cards. Each card shows a survey photo, the score out of 100, when the target is above 30° (the bar spans the dark hours, with a white mark at its highest point), the filter to use and how it fits your scope's field.
- Add to plan puts the target in tonight's Planner queue with a suggested time and filter. Frame it opens it in the Planner's framing map.
The score combines hours above 30° in darkness, how high the target climbs, the hourly cloud forecast and moonlight. Moonlight counts more against galaxies and clusters than against nebulae shot with the LP filter. The ranking is the same whichever Seestar you pick; each card just notes how the target fits the selected scope's field.
The page uses the location chosen on the Weather page, which follows your scope by default. When you take the scope somewhere new, the rankings follow it. Without an internet connection it still ranks targets, using darkness, height and moonlight only.
After dawn, Tonight means the coming night. Targets for other nights can't be added to the plan until that night, because the Planner runs tonight's queue.
When should I shoot it? In a target's details, 📅 When should I shoot it? looks a month ahead instead of only tonight. A bar for each of the next 30 nights shows the target's score, worked out the same way as Best targets: time above 30° (and your horizon) in full darkness, moonlight, and clouds for the nights the forecast reaches (about seven). Later nights are scored on the sky alone. Dots under the bars show the Moon's phase. The best nights are listed with their hours, the Moon and the forecast; click any bar to see that night. 📅 Add to calendar saves the night as a calendar file with a reminder 30 minutes before the target is high enough. Comets aren't included, because they move from night to night.
Tonight's sky sheet. Tonight's sky sheet, in the conditions strip, makes one picture of the night picked in the chips, for the place on the Weather page: the eight best deep-sky targets (no more than three of one kind) with when and where they're highest, the planets and the Moon, comets bright enough for a Seestar, darkness times, the Moon's phase, the forecast if there is one, and sky events in the next two weeks. Save picture saves it as a PNG in your Downloads folder, Copy picture copies it to paste into an email or a chat, and Print prints it on one landscape page.
Sky events. Sky events lists what's coming up in the next six weeks, worked out for your place: meteor showers (with their best rate under a dark sky and how bright the Moon will be), the Moon passing a planet, two planets close together, a planet passing a Messier object, new and full moons, and comets brighter than magnitude 10. Pairings are listed only when you can see them from your place in a dark or darkening sky, with the time, the direction and the height. A green Good for a Seestar tag marks the ones that fit in one Seestar picture, high enough to shoot; tick Only show the ones that make a good Seestar picture to see just those. Meteor showers are for your eyes: meteors are too quick and spread too widely for the Seestar's small field. 📅 saves an event as a calendar file with a reminder an hour before. When one that's good for a Seestar is less than a week away, a green note about it shows under the conditions strip.
Observing lists. Observing lists, in the conditions strip, shows the Messier (110) and Caldwell (109) lists with a bar for how many you've imaged. A target counts as imaged when a stacked picture of it is in a Seestar's album, or a night Nebulink ran finished it (the same history as the Analytics page). Each tile says when you imaged it, or how high it gets in darkness tonight (Up tonight at 30° or more, Low tonight at 15° to 30°), or that it's too far south or north to see from your place. The filters show All, Imaged, Not yet and Not yet, up tonight; click a tile and Add to tonight's plan puts it in the Planner queue.
Messier Marathon. The third tab plans the Marathon: all 110 Messier objects in one night, best around new moon in March or early April. Nebulink picks the darkest night in that season, works out the darkness (the Sun 12° down) and puts the objects in the order that catches each one before it sets. Choose the minutes for each object and the lowest height your horizon allows; the list shows the time and height of each, how many fit, and which are out of reach from your place that night. Save the list (CSV) keeps it for a spreadsheet or a printout; on the night itself, Make it tonight's plan replaces the Planner queue with the Marathon (each object gets the minutes you chose, less about 3 for the GoTo and focus).
Satellite passes. Satellite passes, in the conditions strip, lists the visible passes of the space stations (the ISS and China's Tiangong) for the next five nights, and other bright satellites passing 40° or more above the horizon in the next 14 hours: when each appears, how high it climbs and in which direction, and whether it fades into the Earth's shadow before it sets. Satellites shine by reflected sunlight, so they're seen in the hours after dusk and before dawn. The orbits come from CelesTrak (free), fetched at most twice a day; the times are good to about a minute. While a scope is stacking, Nebulink also checks every few minutes whether one of these satellites will pass within 1.5° of the target in the next 20 minutes, and puts a line on the banner if so (tick A bright satellite is about to cross the scope's field in Settings › Phone alerts to get it on your phone as well). A satellite leaves a bright trail in a frame or two.
Weather
Where the forecast comes from. For a place in the US the hourly forecast comes from the US National Weather Service; anywhere else it comes from MET Norway. The line under the forecast names the source it used.
The Weather page answers "is it worth setting up tonight?" for wherever you're observing. Times are shown in the observing site's own time zone.
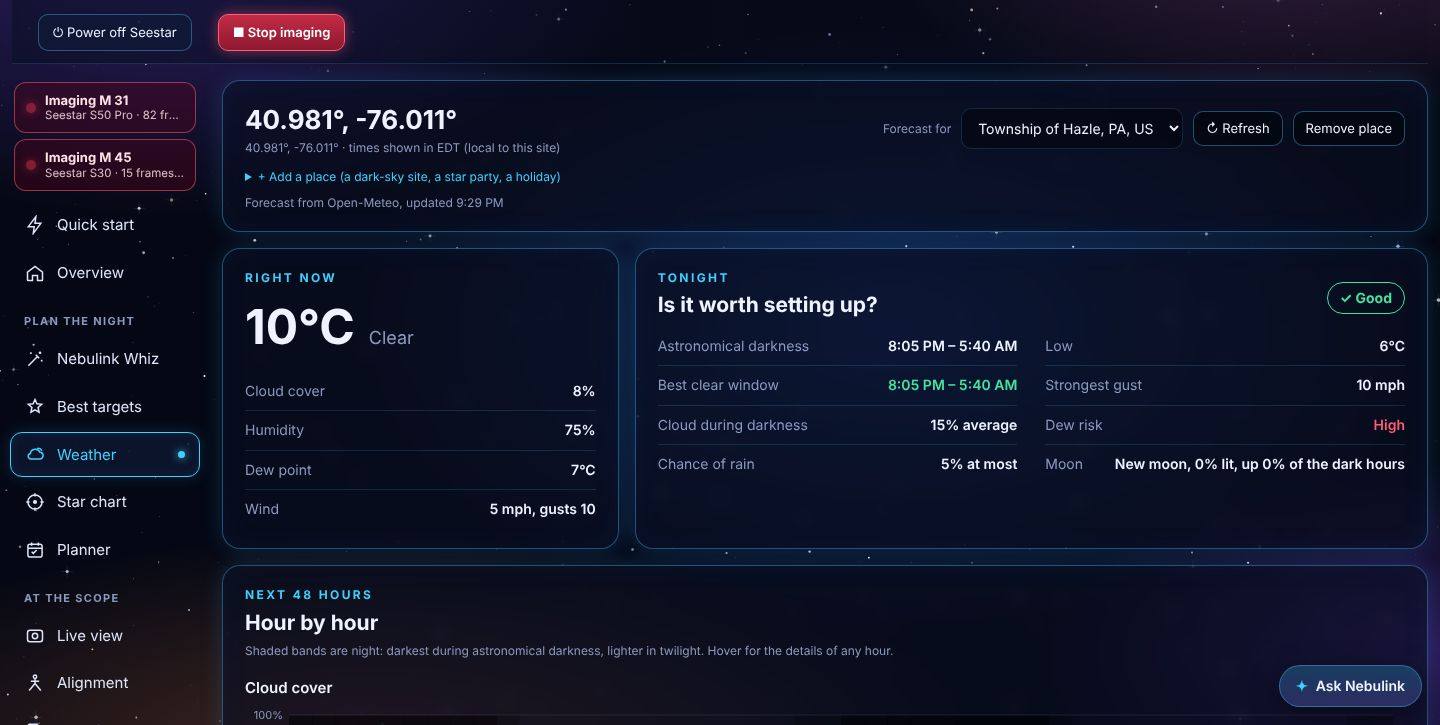
Choose the location. Use Forecast for at the top:
- Follow the scope (the default): follows the position your Seestar reports, so the forecast moves with the scope. If it reports a new spot more than a couple of kilometres away, a note says so.
- This PC's location: uses Windows location (allow it when the browser asks).
- A saved place: open + Add a place, search for a town or site, or type coordinates like
40.96, -75.97. Save this place keeps the current location; Remove place deletes a saved one.
The Best targets page uses the same location.
| Card | What it shows |
|---|---|
| Right now | Temperature, sky, cloud cover, humidity, dew point and wind. |
| Tonight | A Good, Fair or Poor rating, astronomical darkness, the best clear window, cloud and chance of rain during darkness, the low, the strongest gust, dew risk and the Moon. |
| Weather map | Satellite clouds and rain radar around the place, with the place marked. Nearby, Region and Wide show about 250, 600 and 1,550 miles across; untick Clouds or Rain and storms to see one at a time, and ▶ Play the last hour shows how they're moving. The whiter a cloud, the higher and colder its top; the radar goes from blue (light rain) through green and yellow to red and purple (heavy rain and hail). The clouds come from NASA (GOES and Himawari weather satellites, about 30 minutes old) and cover the Americas, East Asia and Australia; the radar comes from NOAA and covers the US, Canada, the Caribbean, Hawaii and Guam. |
| Photo or Infrared | Photo (the first choice) shows NASA's real-color satellite picture (NOAA's GeoColor): the land, cloud, fog and snow as they look from space by day, and city lights with the clouds at night. It covers the Americas and runs about 1½–2 hours behind. Infrared shows the clouds as described above, about 30 minutes old, and also covers East Asia and Australia. Outside the Americas the map uses Infrared. The clouds are part of the photo, so in Photo there is no Clouds box. Nebulink remembers your choice. |
| Weather warnings | The National Weather Service's watches, warnings and advisories for the place (US only), such as freeze, dense fog, wind and severe thunderstorm warnings. Open Details for the full text. |
| Also worth knowing | For tonight's dark hours: thunderstorms, rain or snow, fog, frost and strong gusts, each with what it means for the Seestar. |
| Hour by hour | Charts for the next 48 hours of cloud cover, temperature against dew point (when they meet, dew forms), and wind and gusts. Night is shaded. Hover for any hour's details, or open Show as a table. |
| Night by night | Each night of the week with its outlook, cloud, rain chance, low, dew risk, gusts and Moon. |
| Weather history | How the nights have been at the place over the last 3 months to 3 years, from NASA's records: the share of clear, partly clear and cloudy nights, night lows against the dew point, and wind and rain at night, with the clearest month and the nights with high dew risk or rain. Hover for the details, or open Show as a table. NASA's cloud figures run about 3 months behind, so the newest weeks show temperature, wind and rain only. |
A night is rated Good when average cloud in darkness is 25% or less with little chance of rain, Fair up to 55%, and Poor otherwise. Dew risk is High when the temperature comes within 4°F of the dew point. Press ↻ Refresh to reload; the forecast also updates itself every 20 minutes. Forecasts come from MET Norway and need internet on the PC.
Click the title of the Weather map, Hour by hour or Weather history card to fold it away, and click it again to bring it back. Nebulink remembers which ones are folded. A folded Weather map still shows the warnings line in its title, in red for a severe warning.
Star chart
The Star chart shows tonight's sky over your location, using the position your scope reports, and lets you send the scope anywhere with one click.
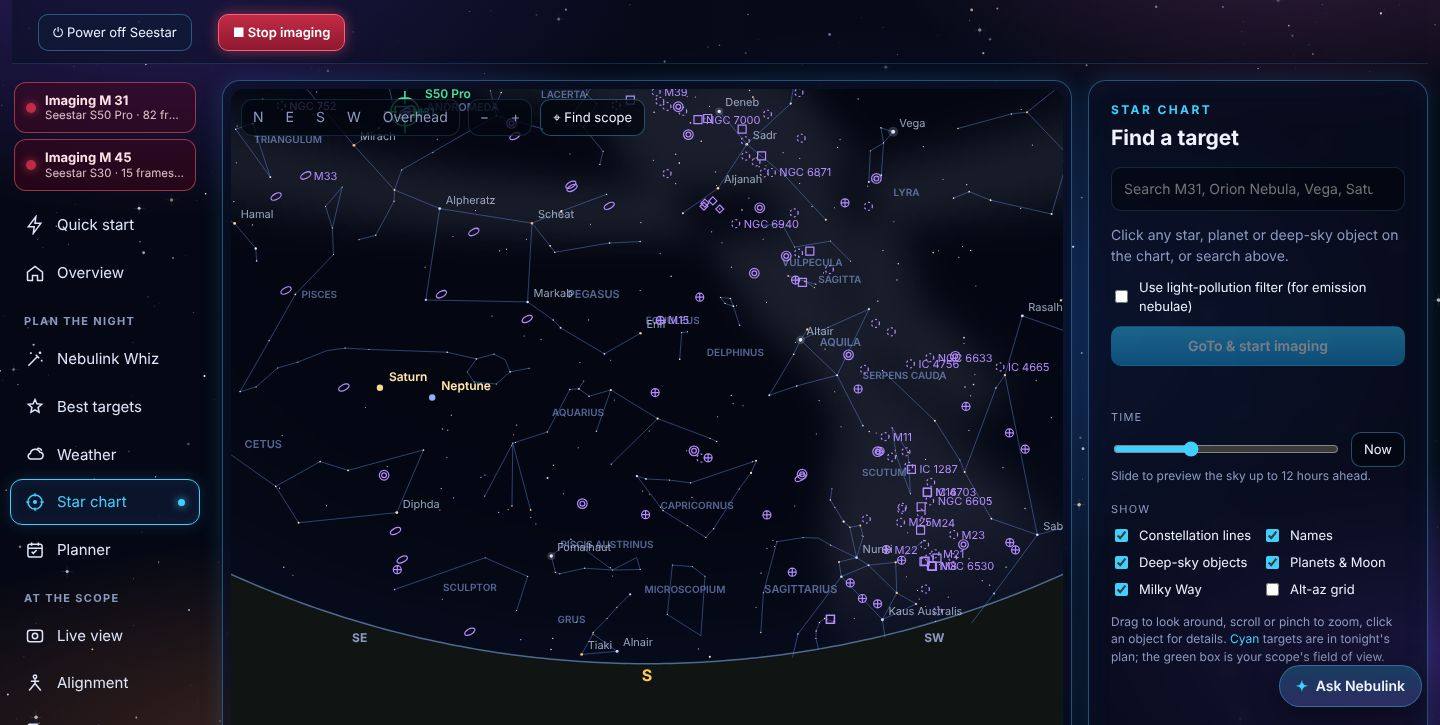
What's on the chart. About 5,000 stars in their true colors, constellation lines and names, the Milky Way, all 110 Messier objects and about 1,500 NGC, IC, Sharpless and other targets (the fainter ones appear as you zoom in), the planets, the Moon with its current phase, and the Sun. Targets in tonight's plan are highlighted in cyan. A green reticle and box show where your scope points and its field of view.
Look around.
- Drag to pan; scroll or pinch to zoom
- N, E, S, W and Overhead jump to that direction
- Find scope centers the chart on where the scope is pointing. While its arm is folded (parked) the scope isn't looking at the sky, so its box isn't drawn and the chart says Arm folded: not pointing at the sky; open the arm with ⤒ Open arm in the status bar
- The time slider previews the sky up to 12 hours ahead; Now returns to the present
- ▶ Play tonight plays the night from dusk to dawn in about 24 seconds. If a plan is queued, each target lights up with a ring and its framing box when its turn comes, and the top of the chart says what's being imaged at that time. Press it again (or Now) to stop
- If you've drawn your horizon on the Settings page, the trees and buildings appear along the bottom of the chart
- The Show checkboxes turn layers on and off, including an altitude-azimuth grid
Find a target. Type a name in the search box (M31, Orion Nebula, Vega, Saturn) or click any object. The panel shows its type, brightness, size, position, current altitude, rise and set times, and when it's highest tonight.
GoTo. Press GoTo & start imaging. The scope slews, plate-solves and starts stacking if stack after GoTo is on in the Seestar app; Nebulink then checks the target landed in the middle of the picture and aims again if it didn't (see Centering in Planner). Tick the light-pollution filter box for emission nebulae.
Safety limits. GoTo is blocked for targets below 15° and for the Sun. For the Moon and planets, use the Seestar app's Solar System mode, which uses suitable exposure settings.
Planner
The Planner lets you line up a night of targets and leave Nebulink to image them one after another while you sleep.
1. Choose a target. Type a name in Object name (for example M31, NGC 7000 or Orion) and pick it from the list. The search covers all 1,600 catalog objects and tonight's comets. Then set:
- Duration in minutes
- Exposure: 10, 20 or 30 seconds per frame; 60 and 90 seconds need EQ mode
- Filter: chosen for you based on the target type; change it if you like
The advice panel explains the target's size compared with your field of view, when it's above 30° tonight, the best filter, a suggested imaging time, and how far it is from the Moon.
2. Check the framing. The sky map shows a survey photo with a blue box for your scope's field of view.
- Drag the map to frame the target off-center; the plan points at the box's center
- Use − and + to zoom, ↺ and ↻ to rotate the box, and Center on object to reset
- Click another object on the map to switch to it
- The dashed green box shows where the scope points now; GoTo this framing now sends it there
The box's angle. The blue box is turned the way your scope's camera will sit on the sky, and the line under the map says why. The Seestar can't turn its camera, so the angle depends on the mount mode:
- Alt-Az: the camera stays upright to the horizon, so its angle on the sky depends on where the target is and when. Nebulink shows the angle for when the target's turn comes in the plan. The field turns slowly through the night; the stacked picture keeps the angle of its first frame.
- EQ mode: the angle stays the same all night. The scope measures it every time it plate-solves, and Nebulink keeps the last EQ value for that scope. Before its first GoTo in EQ, the box shows about 0°.
↺ and ↻ still turn the box, to try out a framing; the angle chip then shows your angle, and clicking it goes back to the scope's own. Mosaic panels are laid out along the box, so with the scope's angle they match what it will really image. The dashed green box (where the scope points now) and the box on the Star chart use the same angles.
3. Add it to the plan. Press Add to plan. The button flashes ✓ Added, a green bar confirms where it went (with View plan ↓ to jump to the list), and the new row lights up. If the target is already in the plan, an amber bar asks you to press Add again before adding a second copy. Each target in the queue shows its estimated time slot and altitude. Red means it will be too low and will be skipped; outside darkness means the slot falls in twilight. Use ↑ ↓ to reorder, ✎ to change its minutes, subs (exposure) or filter right in the list (Save, or press Enter), ⌖ to reopen its framing, and ✕ to remove it.
The timeline. Under the queue, the Timeline shows the night from left to right: daylight, twilight and full darkness as bands, a red line for now, and behind each target a faint curve of its height in the sky (the dashed line is 30°). Each target is a bar; its lighter start is the time for the GoTo, plate solve and focus, and an amber bar dips below 30°. Change the plan right there:
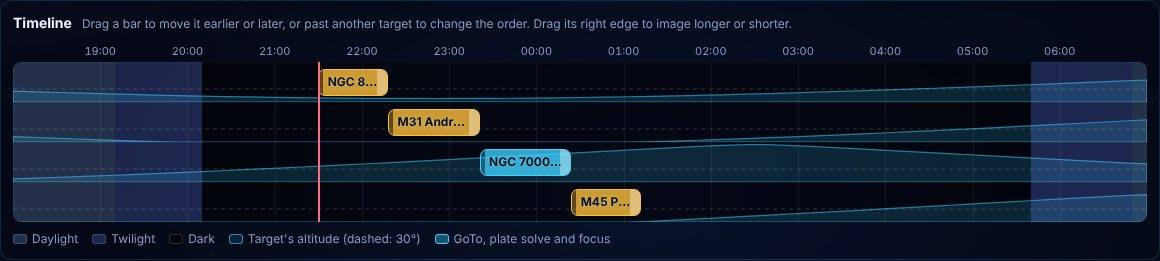
- Drag the right edge of a bar to image that target longer or shorter (in 5-minute steps).
- Drag a bar past another to change the order.
- Drag a bar later to leave a gap: that target then waits until the time you dropped it at (a ⏱ marks it, and the queue says not before). For example, wait for a target to climb higher, or for the Moon to set. Press ✕ next to not before in the queue, or drag the bar back, to remove the wait.
The plan still runs as a queue from top to bottom, so dragging a bar earlier than the target before it puts it first. While a plan is running, the timeline shows its progress but can't be changed.
4. Start the plan. Choose As soon as I press Start or a start time; the time defaults to when full darkness begins. Wait for darkness if it isn't dark yet is ticked at first: untick it and the plan starts exactly when you said, even in twilight. Leave Park the scope after the last target and Stop at dawn ticked unless you have a reason not to. Press Start plan and confirm.
Mosaic (next to Filter) images a big target as 2 to 9 overlapping panels; see Projects and mosaics. Pause for clouds, then try again (ticked at first): when the scope keeps no frames for a few minutes, usually because cloud has come over, Nebulink stops stacking, waits 10 minutes and starts again on the same target, as long as its time isn't up. The queue notes how many times it paused.
Storm guard (on by default) watches for storms while a plan runs. Every two minutes Nebulink checks the National Weather Service's warnings for the scope's place (a severe thunderstorm, tornado or similar warning) and NOAA's rain radar within about 15 miles (heavy rain) or 5 miles (steady rain); both cover the US. When one comes, Nebulink stops the stack, closes the arm, puts a red line on the banner and sends a phone alert. It carries on once there's been no storm for 20 minutes: the target is found and stacked again if its time hasn't run out, otherwise the plan moves on to the next one. Outside the US there's no warning or radar data, so storm guard has nothing to go on; Pause for clouds still works everywhere.
Battery check. Under the plan settings, a line says whether the selected Seestar's battery will last the plan: charging, enough, or about how long it lasts against how long the plan needs. Nebulink learns how fast each scope's battery goes down from its own use (whenever it runs on battery for half an hour or more) and keeps a figure for each scope, so it gets better the more you use it; until then it assumes a full battery lasts about 6 hours and says it's a rough guess. If the battery probably won't last, Start plan asks first.
For each target, Nebulink then:
- Checks the target is at least 15° up (and above your own horizon, if you drew one), and skips it if not
- Sets the filter and exposure
- Sends the GoTo; the scope plate-solves and focuses
- Checks the target landed in the middle of the picture, and aims again if not (see Centering below)
- Checks the scope's autofocus worked (see below)
- Stacks for your chosen time, then stops and moves on
Focus during a plan. The Seestar focuses by itself after each GoTo, and starts stacking even when that focus failed. Nebulink watches for this: when the scope's autofocus fails, it stops the stack, focuses once more and starts a fresh stack. If the second try fails too, the plan stops instead of stacking the whole target out of focus. The scope isn't parked, and you get a phone alert if alerts are on. Check the sky and the lens, focus in Live view, then press Start plan: it carries on with the same target. If you press Start autofocus in Live view while the plan is stacking, the plan waits for the focus to finish, then starts a fresh stack on the same target instead of moving on.
Centering. After each GoTo, Nebulink reads where the picture's center is from the Seestar's own plate solve (of its first stacked frames, or the one it made during the GoTo). If that's more than about 2′ from the target (2.5% of the field's short side, so 3.4′ on an S30 Pro), it stops the stack and sends the GoTo again: the scope has set its position from the plate solve, so a short GoTo lands much closer. If it lands the same way off again, the next try aims past the target by the error. After two tries it images what it has. The plan log says how far off each target landed. The same check runs after GoTo this framing now and the Star chart's GoTo, and the status bar says what happened.
Targets that keep stopping. If a stack ends by itself before its time (Stop stacking, the Seestar app on a phone, or the scope itself), the plan moves on to the next target. If that happens to two targets in a row within a few minutes of starting, something is wrong, so the plan stops instead of running through the rest and parking. The scope stays where it is; fix the cause, then press Start plan to carry on.
If a filter change or GoTo times out or isn't confirmed (a weak Wi-Fi link can drop one), Nebulink tries again up to three times. If a GoTo was accepted but the scope hasn't started stacking within 8 minutes, Nebulink stops it and runs the GoTo again (up to three tries, 4 minutes each after the first) before moving on to the next target; each try is written in the plan's activity list. If you start before it's dark and Wait for darkness is ticked, the plan waits until the sky is dark (the sun 12° below the horizon), then begins; the queue's times and the Start confirmation show when. Untick it to start right away. With Stop at dawn ticked, the plan ends when the morning sky starts to brighten (evening twilight never stops it); after the last target the scope parks.
Planning without a Seestar. You can build a plan before you've added a scope, for example on a laptop indoors. Add to plan on Best targets, the Planner and Nebulink Whiz all save to a plan kept on this PC (Whiz offers Just save it to the Planner). Start plan stays off until a Seestar is added. When you add one with Find my Seestars, the saved targets move into its plan by themselves and a notice says so. If you've added a Seestar that's just switched off, plans are saved for it as usual and start once it's on.
Watch or stop it. The status line and activity log show progress, and you can switch to other pages while it runs. Stop plan ends the current stack, keeps the frames already taken, and leaves unfinished targets in the queue. Reset finished marks every target as not yet imaged so you can run the plan again. Clear plan removes every target so you can start a new list (it asks first, and isn't available while a plan is running).
Keep the PC running. The plan runs on your PC. Keep the PC on and Nebulink open; the screen can turn off, and Nebulink stops Windows from going to sleep while a plan runs. The queue is saved, so it survives closing the app.
If Nebulink restarts during a plan. A running plan remembers which target it's on and when that target should finish. When Nebulink starts again it carries on: if the scope is still stacking that target it waits out the remaining time, if the scope has stopped it aims again and stacks for the time left, and if the target's time ran out meanwhile it moves on to the next. The plan's log says Nebulink was restarted while the plan was running. A plan you stopped yourself isn't picked up, and neither is one from a night that has already ended at dawn.
Add to calendar. 📅 Add to calendar (next to Start plan) saves tonight's plan as a calendar file that Outlook, Google Calendar and Apple Calendar open: from 30 minutes before the first target (time to set up) to the end of the last one, with each target's times in the notes and a reminder at setup time.
Live view
Live view shows what the scope sees and lets you move and focus it by hand.
Layouts. The Layout buttons at the top arrange Live view six ways: Control rail (the picture with the controls beside it), Cockpit (the arrows and focus on the picture), Portrait frame (a tall picture with the controls either side), Bottom dock (Move, Focus and Capture under the picture), Tabs (one tool at a time beside the picture) and Theater (the whole picture, with a toolbar and pop-ups on it). The buttons work the same in each, and Nebulink remembers your choice.
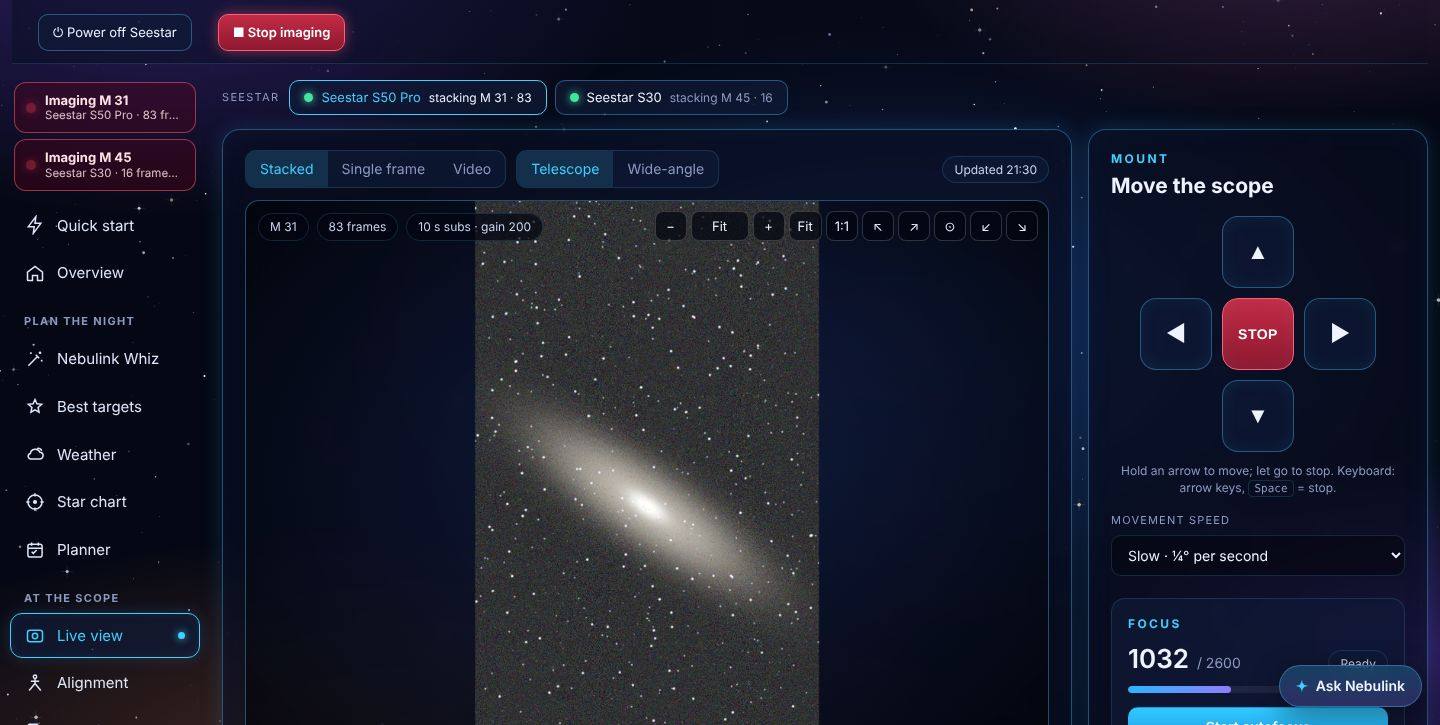
Choose a picture. Pick a source and a camera at the top of the viewer:
- Stacked: the running stack, updated as each new frame is stacked
- Single frame: the latest individual exposure
- Video: the scope's live video stream. It runs whenever the camera is on: while the scope is imaging a target, or after Turn on camera (below).
- Telescope or Wide-angle: the main camera or the wide-field camera
Map your horizon (point and mark). Open Map your horizon under the movement speed. Pick a spot, or press + New spot, name it (say “Yard – South corner”) and press Start this spot. An orange + appears in the middle of the picture. Steer the scope with the arrows until the + sits on the top of a tree or roof, let go, and press Mark here: Nebulink asks the scope where it's pointing and saves that direction and height to the spot. Work round from one side to the other; a mark every 10–15° is plenty, and where the sky is open low down, mark a point just above the ground. Marks fill in the horizon between them (up to 45° apart); directions you don't mark keep what you drew in Settings. Undo last mark takes one back, and Tidy it in Settings opens the drawing to adjust it by hand. The direction comes from the scope's own idea of where it points, so it's most accurate after a GoTo has plate-solved that night; at dusk, use the Wide-angle camera to see the treeline.
Mark with the telescope camera. The orange + is drawn on the telescope camera's picture, so choose Telescope before you start marking. The wide-angle camera doesn't work for marking: on some Seestars it sends no picture while the telescope camera is imaging, and it may need Landscape mode set in the Seestar app first. Nebulink can't change that setting.
Scan your horizon automatically. At the bottom of Map your horizon, Or scan it automatically lets the Seestar do the marking. Pick which part of the sky to scan (the whole circle, or the north, east, south or west half) and press Start the scan. The Seestar first counts the stars high up in open sky, then, every 15° round the sky, steps up or down in 5° steps to find the height where the stars appear above the trees and roofs. It takes under a minute per direction, about 20 minutes for the whole circle, and each direction is saved as soon as it's measured, so stopping part way keeps what's done. The scan replaces the picked spot's heights in the directions it scans and leaves the others alone; with no spot picked, it makes a new one called “Horizon scan” and the date. Do it on a clear, dark night, in Alt-Az mode, after one GoTo, with no stack or plan running. Clouds look like trees to the scan, so check the result in Settings and tidy any direction a cloud got in the way of. A direction marked as blocked had no stars at any height, from something tall or a cloud. While it runs, a countdown under the progress bar shows the time left, when it should finish and how long it has been going; until the first direction is done the time left is a first guess. The scan runs inside Nebulink, not in the page, so you can go to any other page while it works: a blue HORIZON SCAN banner under the header shows how far it has got on every page (Open Live view → takes you back), and Live view picks it up again when you return or reload the page. If a scan stops part way, Continue the scan carries on from the direction where it ended, with what was measured so far kept, so you don't start over.
Turn on camera (preview). When the scope isn't imaging, there's nothing to show until its camera is running. Press Turn on camera (in the viewer, or under it) for a plain live view: the camera runs, but the scope doesn't move, track a target or stack, and nothing is saved on the scope. Nebulink switches to Video by itself. Use it to frame a landscape or the Moon, check focus, or see where the scope is pointing while you move it with the arrows. Press Turn off camera when you're done. A GoTo, a plan or Start stacking takes over from it as usual. This is a preview: if the video doesn't appear on your scope, please send a log from the About page.
Move the scope. Hold an arrow to move; let go to stop. The big STOP button halts movement immediately. On the keyboard, the arrow keys move and the Space bar stops. Choose a speed from Slow (¼° per second) to Max (6° per second). Each move command only lasts one second, so the scope stops on its own if the connection drops.
Focus. The focus box shows the current focuser position. Start autofocus lets the scope focus itself on stars, which takes a minute or two. The −50, −10, +10 and +50 buttons nudge focus by hand. Pressed while the scope is stacking, it asks first, ends the stack (the frames so far are kept) and starts the focus as soon as the scope is ready; during a plan, the plan then carries on with a fresh stack on the same target.
Save photos and video. Save photo saves a full-resolution PNG, plus a 16-bit TIFF of deep-sky images for processing in programs like your stacking software or PixInsight. Record video records the video stream to MP4. Files go to your Pictures\Nebulink folder and also appear on the Album page under Saved on this PC.
Burst. On the Planets and Moon pages, ● Burst next to Save photo saves a run of pictures from the live video, one file per frame, in a folder of their own: Pictures\Nebulink\<date>_<scope>_burst-tele. Pick 25, 50, 75 or 100 from the list, or type any number from 2 to 1000. The page shows the count as it goes and ■ Stop burst ends it early. A planet is better stacked than saved as a single frame, so take a burst and stack it in the Planet stacker, AutoStakkert or PIPP.
Star party mode. Star party mode (under the viewer, and on the Overview's stacked image) fills the screen with the scope's live stacked picture for visitors, on the PC's screen or a projector. Beside it: the object's name, how far away it is and when the light you're seeing set off, its size and brightness, a few facts that change every 15 seconds, how much light the scope has collected so far, and a QR code that opens the object's Wikipedia page on a phone. It follows the scope as a plan moves from target to target. Distances and facts cover about 70 popular targets (the Messier showpieces, the bright nebulae, the Moon and planets); for others it shows the catalog name, type and brightness. Move the mouse to show the Leave star party mode button, or press Esc.
If the scope is busy. Moving or focusing while the scope is stacking asks you to confirm first. If you go ahead, the stack ends cleanly and the frames so far are kept.
Switching scopes. Use the Seestar switcher at the top of the page. If you're recording video when you switch, Nebulink stops and saves that recording first, and any arrow you're holding is released.
Alignment
The Alignment page helps you level the tripod, check the mount, park the scope, and set up equatorial (EQ) mode.
Layouts. The Layout buttons at the top arrange the page six ways: Two columns (the level dial beside the mount, EQ and polar alignment cards), Polar first (polar alignment large, the rest in a column beside it), Three columns (level, polar alignment and the mount side by side on a wide screen), Step by step (one step at a time, ticked off from the scope's own readings), Summary tabs (four tiles with the latest readings; press one to open it) and Big readout (the polar error and the arrows in large type, easy to read from the scope; the other cards are under Level, mount & EQ setup). The buttons work the same in each, and Nebulink remembers your choice.
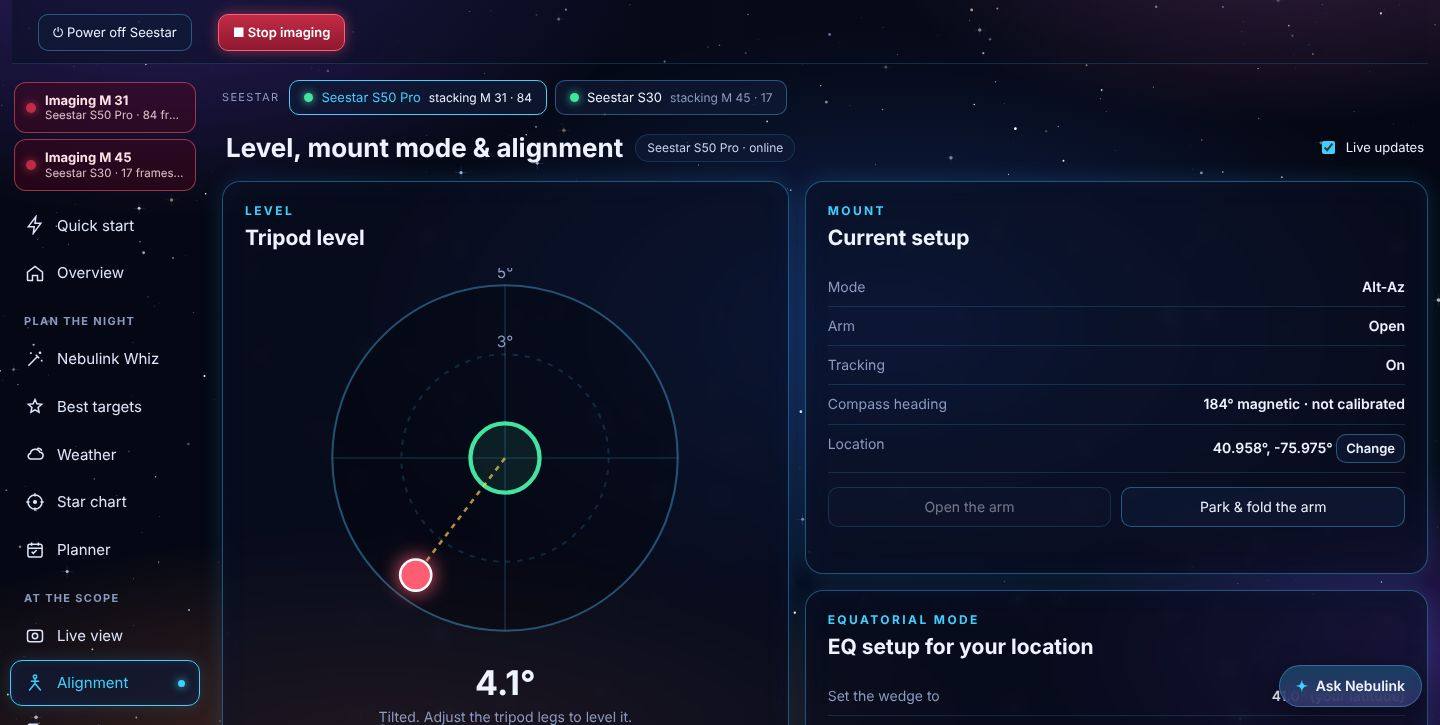
Level the tripod. While the page is open, the dial reads the scope's tilt sensor about once a second. The edge of the dial is 5° of tilt. Adjust the tripod legs until the dot sits in the small green circle; the dot turns green below 1°. Watch which way it moves as you adjust to learn which leg to raise. A level tripod improves GoTo and tracking accuracy, even in normal Alt-Az mode. In EQ mode the wedge tilts the scope on purpose (90° minus your latitude), so the dial checks that tilt instead: on a wedge set to your latitude it shows green, and the tripod doesn't have to be exactly level, because polar alignment measures where the scope's axis really points. The Level item in the status bar shows the same check (green, amber or red) on every page.
Mount status. Shows the mount mode (Alt-Az or EQ), whether the arm is open or folded, tracking, compass heading and location (press Change beside it to set a new location). The compass is only approximate until it's calibrated in the Seestar app.
Open and park. Open the arm raises the folded arm to level, ready for a GoTo. Park & fold the arm moves the scope to its home position and folds it down. Make sure nothing is in the way. The same controls are in the status bar as Open arm / Close arm.
EQ mode. The page shows the numbers for your location: set the wedge to your latitude (for example, 41.0° in Hazleton, Pennsylvania) and point it at true north. Switch to EQ mode stays locked until you tick the box confirming the scope is on a wedge, set to that angle, facing north, with room for the arm to swing. Switching stops imaging and swings the arm to the EQ home position.
Polar alignment (preview). Once the scope is in EQ mode, choose where to measure (overhead is usually best), press Measure polar error and confirm. The scope moves to three positions and plate-solves at each, which takes a couple of minutes; the steps are shown as it goes, with the telescope's live video (or its latest frame, if there's no video). The result is the total error and which way to move the wedge, like the Seestar app: ⬆ Up or ⬇ Down with the altitude knob, and ⬅ Left or ➡ Right with the azimuth knobs, as seen standing behind the scope facing the pole. The dot shows the same thing: move the wedge to bring it into the green circle, under 5′. If moving the way an arrow says makes that number grow, press Flip up/down or Flip left/right; Nebulink remembers it.
Nebulink shows only its own measurements. A polar alignment done in the Seestar app (or NINA's three-point polar alignment) isn't read by Nebulink, so the card keeps showing Nebulink's last result, with the time it was measured, until you measure again. You don't need Nebulink's polar alignment if you already align another way.
Press Live adjust. The scope doesn't measure on its own: turn a knob a little, let go of the wedge, then press Next measurement to take a reading. Each reading starts 5 seconds after you press it, so the wedge can be left alone. The status line says when a reading is being solved, when the next one starts, and when the last result came in; wait for it to say Ready before you judge a change, because a change made during a solve counts in the next reading. Tick Repeat readings automatically to have readings repeat every 5 seconds instead. For one reading at the current position, without moving the arm, press Measure here. Each reading shows whether the error went down (better) or up (worse: turn the other way). Press Stop when you are done. Under 15′ is good for the Seestar; under 5′ is excellent. The dial is hidden by default; press Show dial to see it. This is a preview: please send a log from the About page if anything looks wrong.
Stacking
The Stacking page is where you choose the filter, start and stop live stacking, and watch the picture build.
Layouts. The Layout buttons at the top arrange the page six ways: Side column (the cards in a column beside the picture), Portrait frame (the Seestar's tall picture in the middle, the cards either side), Picture on top (a wide picture with the cards under it), Dashboard (tiles with the frame count, integration, star size, filter, darks and target across the top; press one to go to its card), Tabs (one card at a time beside the picture) and Theater (the picture fills the window, with Save and Refresh on it and the cards in pop-ups). The buttons work the same in each, and Nebulink remembers your choice.
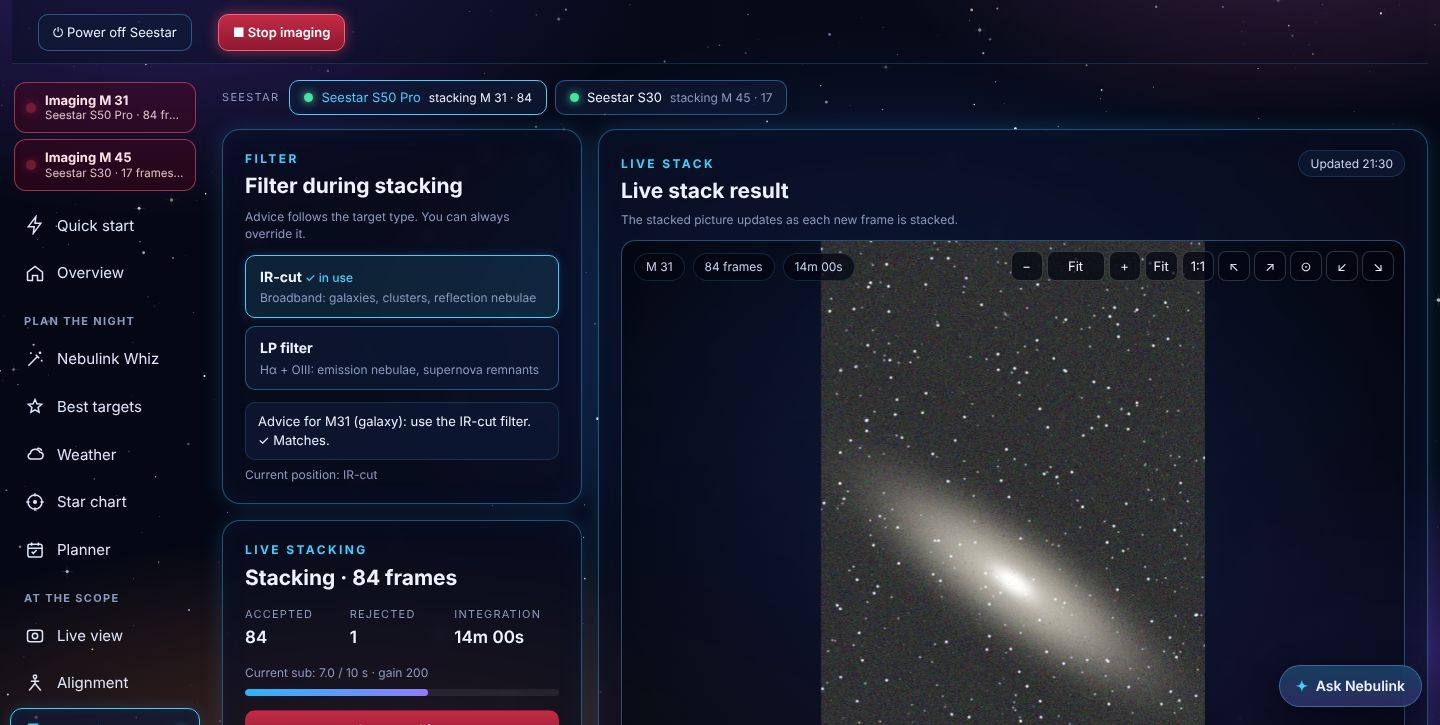
Filter. Press IR-cut or LP filter; the one in use is highlighted.
| Filter | Best for |
|---|---|
| IR-cut | Galaxies, star clusters and reflection nebulae (natural color) |
| LP (Hα + OIII) | Emission nebulae and supernova remnants; also cuts light pollution |
Nebulink looks up your current target, recommends a filter, and warns you if the other one is in place.
Live stacking. Shows the stack's state, frames accepted and rejected, total exposure time, and a progress bar for the current exposure.
- Start live stacking begins stacking on the current target
- Stop stacking ends it after a confirmation; the frames so far are kept and the scope saves the result
- Restart stack from zero throws the current stack away and starts again
Zoom in to check star shapes. Live view and the Stacking page's picture can be zoomed: scroll the mouse wheel over the picture, double-click a spot (double-click again to see the whole picture), or use the buttons at the top right: − and +, Fit (the whole picture) and 1:1 (one camera pixel per screen pixel). Drag to move around. ↖ ↗ ⊙ ↙ ↘ jump straight to a corner or the center, so you can compare stars across the frame: stretched stars in one corner only point to tilt, all the corners stretched outward to coma or field rotation, and every star stretched the same way to tracking or wind. The small map at the bottom right shows which part you're looking at. Zoomed in, Nebulink fetches the part on screen at the camera's full resolution, so the detail is sharper than the page's copy of the picture; the zoom stays where it is as new pictures arrive. Video can be zoomed too, at the video's own resolution.
Live stack result. A large view of the stacked picture, updated as each new frame is stacked, labeled with the target, frame count and total time. Nebulink fetches each new picture in the background as soon as the scope reports another frame, so it's ready when you look. When stacking stops, the last picture stays on screen. Save stack writes a PNG to your Pictures\Nebulink folder, plus a 16-bit TIFF when the picture setting below is Full quality.
Stacked picture from the scope. Under the picture, choose how the scope sends it:
- Fast (the default): a finished JPEG of about 2.5 MB, which arrives in seconds even over a busy Wi-Fi network
- Full quality: the raw 16-bit picture (25–50 MB), for processing elsewhere. Over Wi-Fi each one can take minutes
This is a setting on the Seestar itself, so the Seestar app sees the same choice. The stacks the scope saves to its own storage are full quality either way.
Current target. Name, type, coordinates, current altitude and time on target, with a shortcut to the Star chart to pick something new.
Focus and dew watch. While the Seestar stacks, Nebulink measures the size of the stars in the picture every two minutes. The first few measurements set the starting size for the target; the line on the chart shows it, and the dashed line marks 35% bigger. If the stars stay more than 35% bigger for two measurements in a row, the card turns amber, the banner at the top of the page tells you, and a phone alert is sent if you've ticked Stars getting soft in Settings. Usually the focus has drifted as the night cooled: press Start autofocus. If the dew heater is off and the night is damp, dew on the lens is more likely: press Turn on the dew heater and give it 10 to 15 minutes. After an autofocus the watch measures the new starting size. When cloud hides the stars it waits, rather than warning you.
Dark library. A dark frame is taken with the shutter closed: it records the sensor's own noise, hot pixels and glow, which the Seestar then subtracts from every frame of a stack. Seestar firmware (Seestar app 3.4.0 and later) keeps a library of master darks on the scope and, while it stacks, picks the one that best fits each frame's exposure and temperature, so the more temperatures the library has, the cleaner the pictures. The Dark library card on the Stacking page shows the exposure the Seestar stacks with and its temperature now, and whether the library already has a close match (within 3 °C, about 5 °F). Build darks now asks the Seestar to build darks: it closes its dark filter and works by itself for a few minutes, and can't image meanwhile, so stop imaging first. If the Seestar's camera is still on from the last target (after Stop imaging it keeps taking preview pictures) or from Live view, Nebulink turns it off first, because the Seestar won't build darks while it's on; nothing moves. While it works, a blue BUILDING DARKS banner shows under the header on every page. Stop ends it early. Tick Build darks when a plan finishes and, at the end of each plan, the Seestar builds darks at that night's temperature before it parks. The table shows the builds Nebulink has seen, by exposure and temperature: the ones you started and the ones the Seestar does by itself before a stack; the outlined square is tonight. Nebulink uses the temperature the Seestar reports for itself (the one in the status bar), while the Seestar matches on its sensor's temperature, so take the table as a guide. Copy masterdarks to this PC looks for them in the Seestar's shared folder and copies them to Pictures\Nebulink\Dark library, for your own processing; if it can't find them there, save them from the Seestar app (Me → Device management → Sensor calibration → Dark library). Never delete masterdarks on the Seestar: it needs them.
Album
The Album lets you browse, preview and download your pictures, and copy them to this PC to free up space on the Seestar. Nothing on the scope is changed or deleted unless you ask for it with Copy to PC (below). Small pictures load several at a time, and every picture you've looked at is kept on this PC, so it opens at once next time, even after a restart. The first look at a new night's folder still has to come over Wi-Fi, so it's quickest with the scope close to your router.
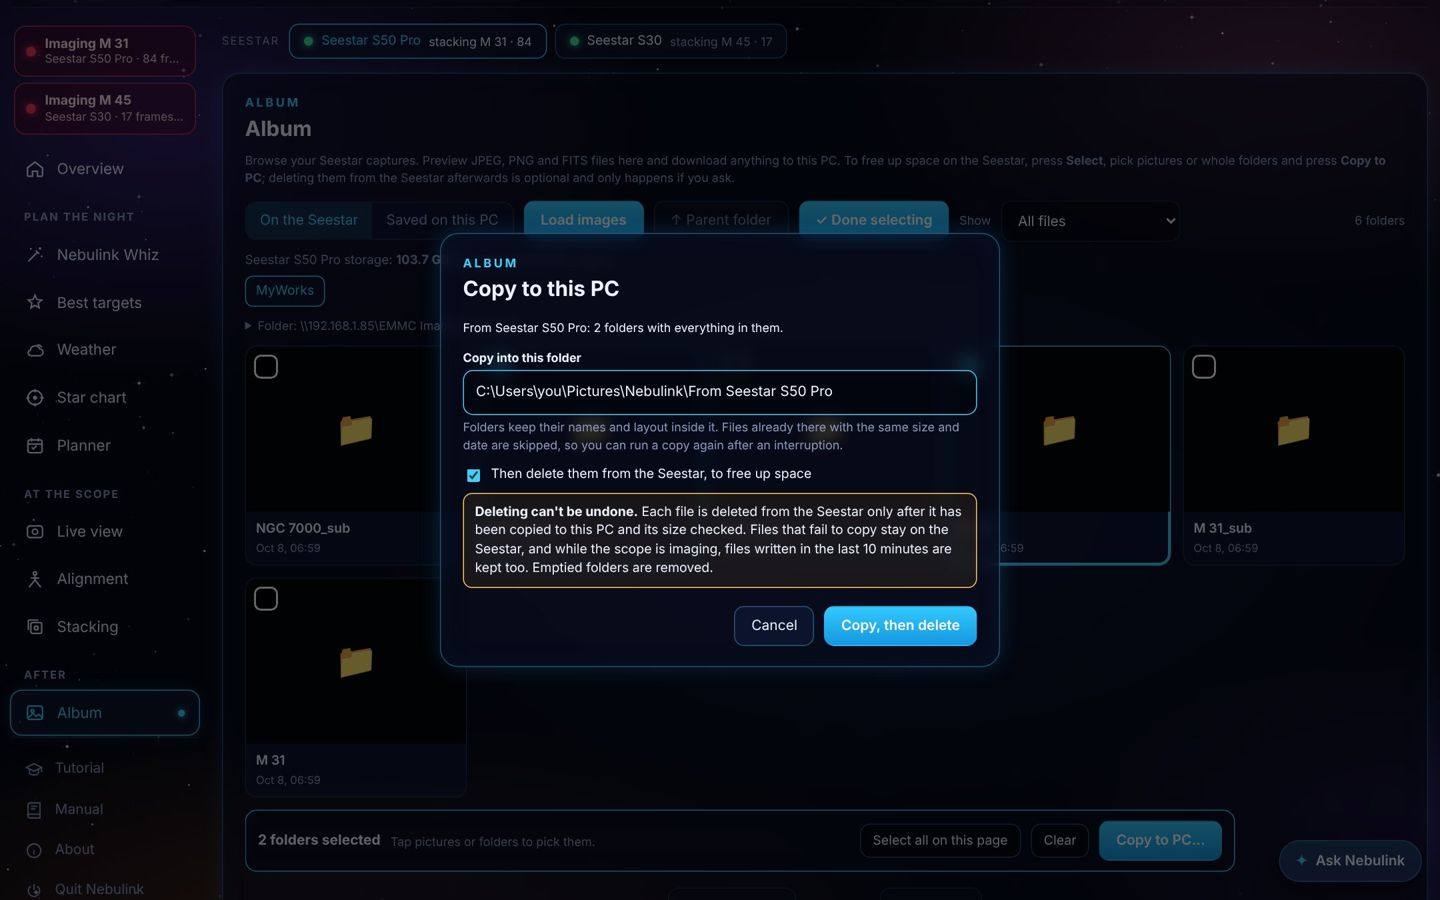
Folders load quickly the second time. Nebulink remembers each folder's list for two minutes, so going back up, opening a folder again or switching scopes and back is instant. Load images always fetches a fresh list. If a scope answers slowly, the Album says it's still waiting for that scope's Wi-Fi.
On the Seestar. Press Load images. Nebulink opens the scope's shared folder (normally \\<scope address>\EMMC Images\MyWorks) and lists your target folders, newest first. Each target usually has two folders: one with the stacked results and one ending in _sub with the individual frames.
- Click a folder to open it; use the folder buttons or Parent folder to go back
- Show narrows the list to images, FITS files or videos; long folders show 48 files per page
- Click a file for a large preview; use the arrow keys or ‹ › to step through, and Esc to close
- Download saves the original file to your PC
FITS files are previewed too: Nebulink converts and brightens them so you can check individual frames without other software. Videos can be downloaded but not previewed.
Labels. In the picture viewer, Labels names what's in a stacked picture: galaxies (yellow), nebulae (pink), clusters (blue) and named bright stars, with dashed outlines for the bigger objects and arrows for north and east. Nebulink works out exactly where the picture is on the sky by matching the stars in it to the Gaia star catalog, which it fetches for that part of the sky from the free CDS VizieR service the first time and then keeps on this PC. This takes a few seconds, and the line under the picture then says how many stars matched, the field size and which way is north. It works for pictures named after a catalog object (as the Seestar names its stacks, M 31, NGC 7000, Sh2-155…) with sharp stars; clouds, very short stacks or a picture of somewhere else can stop it. Save with labels saves a copy of the picture with the labels drawn on it.
Copying to this PC and freeing up space. The Seestar's built-in storage fills up quickly; the line under the tools shows how much is free. Press Select, then click pictures or whole folders to pick them (Select all on this page picks everything shown; you can pick in several folders before copying). Press Copy to PC…, choose the folder to copy into (at first Pictures\Nebulink\From <scope name>; Browse… opens Windows' folder window) and press Copy. Folders are copied with everything in them, keeping their names. A bar shows the progress and Stop stops it; files already copied stay on the PC, and running the same copy again skips them. To free up space, tick Then delete them from the Seestar and confirm. Each file is deleted only after it has been copied and its size checked; files that didn't copy are kept, and so are files written in the last 10 minutes while the scope is imaging. Folders left empty are removed. Deleting can't be undone, so keep the copies safe. Copying a large folder over Wi-Fi takes a while (a few MB a second is usual); keep the PC awake and Nebulink open until it finishes.
Saved on this PC. This tab shows the photos and videos you saved from Live view and Stacking, and the pictures you copied from the Seestar (in their From <scope name> folder). Folder picks which folder on this PC it shows: Pictures › Nebulink, and every other folder you've copied pictures into with Copy to PC, which is added to the list by itself. Choose a folder… opens Windows' folder window to show any other folder (or type its address), and Remove from the list takes a folder out of the list without deleting anything. When a copy finishes, Show them opens this tab at the folder the pictures went to.
Signing in. The Seestar shares its files with the user name Guest and no password. Nebulink connects to the scope and signs in as Guest by itself, so there's no password box and nothing to change in Windows. In the rare case that this direct connection doesn't work, Nebulink tries Windows' own file sharing instead; if Windows blocks guest access there, the Album says so and the manual's Troubleshooting section gives the PowerShell steps to allow it yourself.
Setting the folder by hand. If Nebulink can't find the scope's files, open Folder under the buttons, paste the folder path, and press Use this folder. Find automatically searches again.
Enhance
Enhance turns a picture from the Album into one that's ready to share, without other software. Open any stacked FITS, JPEG or PNG and press ✨ Enhance at the top of the preview. Nebulink works on the full picture, so a FITS file gives the best result: it still holds all the faint detail the Seestar captured.
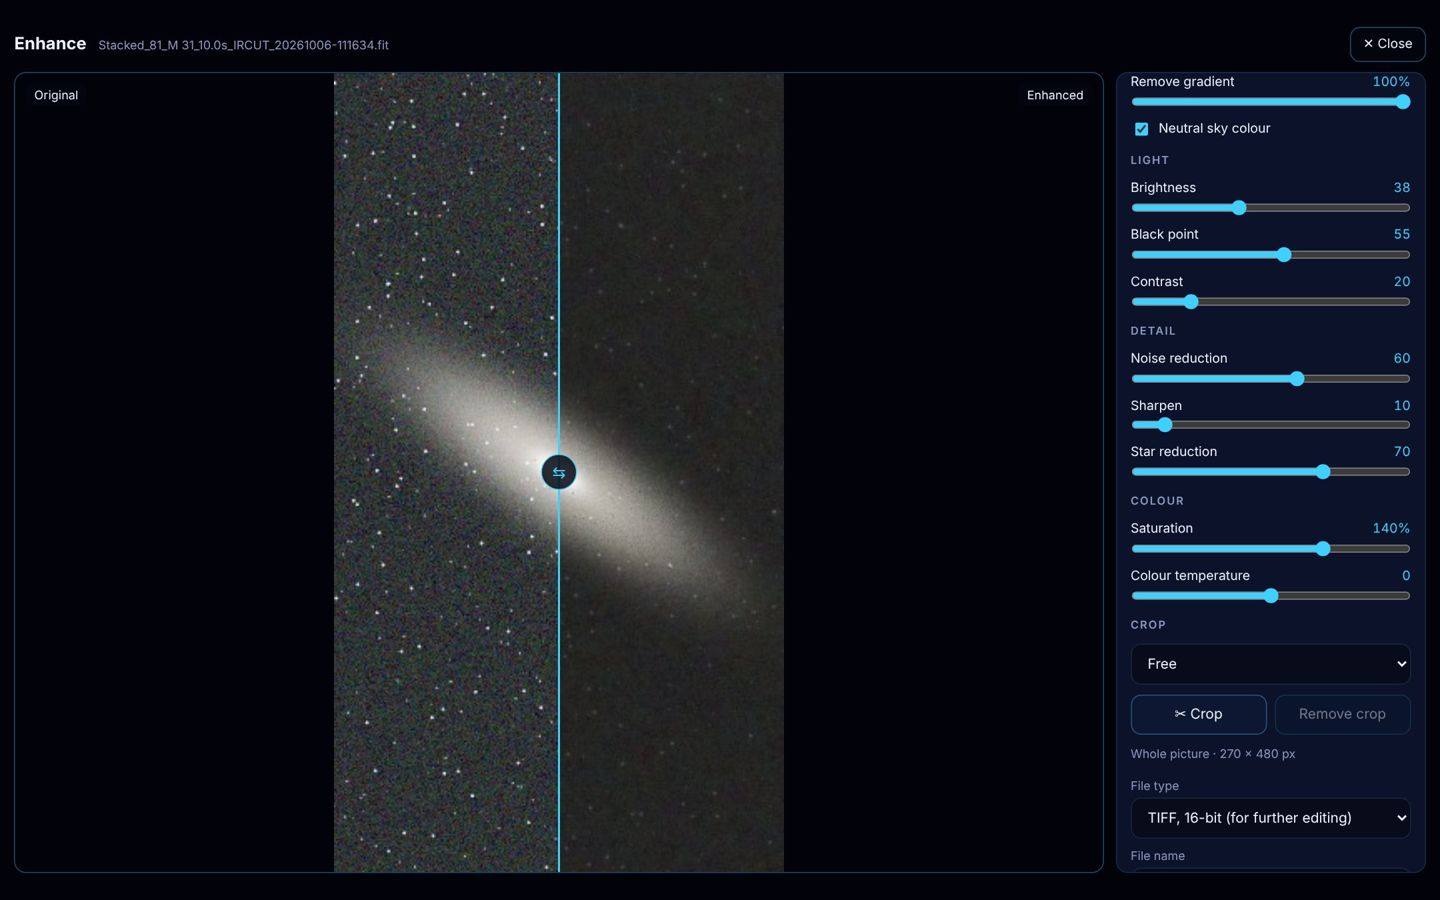
Auto. Nebulink starts with settings picked for that picture: it removes the light-pollution gradient, makes the sky background neutral grey, balances the stars to white, brings up the faint signal and smooths the noise. ✨ Auto puts these settings back at any time; Undo all switches every step off.
- Remove gradient: light pollution and moonlight make one side of the sky brighter. The glow's color is always removed; the slider sets how much of its brightness goes. Lower it if a large nebula that fills the frame starts to fade
- Neutral sky color: takes out the green or orange cast of light-polluted skies
- Brightness lifts the faint parts; Black point sets how dark the sky is; Contrast adds a gentle curve
- Noise reduction smooths the dark background and color speckles, leaving stars and detail alone; Sharpen works only on the brighter parts, so it doesn't sharpen the noise; Star reduction shrinks and dims the stars so nebulae and galaxies stand out, while the sky and the nebula itself keep their brightness. Around 30 to 60 suits a crowded Milky Way field; at 100 stars stay visible but small and faint
- Saturation and Color temperature set the colors
AI processing. The AI processing section uses GraXpert, a free astrophotography program, to remove gradients, remove noise and sharpen (deconvolution) with artificial intelligence. GraXpert isn't part of Nebulink: install it yourself from graxpert.com (its AI is free for personal use). Nebulink finds it where programs are installed (Program Files); a copy in Downloads, on the Desktop or in Documents is filled in for you, so press Find GraXpert to use it; otherwise type where GraXpert.exe is and press Find GraXpert. Tick the steps you want, set the noise removal strength and press Process with AI. GraXpert works on the full picture in the background, which can take a few minutes on a PC without a graphics card; the first time, it downloads its AI models, so the PC needs internet. When it's done, the result replaces the picture you're editing: the gradient, noise and sharpen sliders are turned down because the AI has done that work, and every other slider and the crop work as usual. Original still shows the picture before AI. Undo AI goes back to it. Sharpening needs GraXpert 3.1 or later. Without GraXpert, Built-in clean-up turns up Nebulink's own gradient removal, noise reduction and sharpening instead (no AI).
Satellite trails. When a picture opens, Nebulink looks for the straight streaks satellites and planes leave and takes them out: under Satellite trails it lists each one it found, and while Show where they are is ticked, each is marked on the picture with a dashed yellow line and its number. Untick a trail to put it back (for example a straight edge that isn't a trail). If it missed one, press ✎ Mark a trail and click both ends of it on the picture: Nebulink moves the line onto the streak if it's within a few pixels, and takes it out too (✕ removes a trail you marked; Esc stops marking). A trail is taken out by measuring, step by step along it, how much brighter it is than the sky right beside it and subtracting only that, so the stars and nebula it crosses keep their own light. It's done first, on the full picture, before every other step, and the saved picture is free of it too. Original shows the picture with its trails. A trail is followed across a bright galaxy or nebula even where it's hard to see. Look again searches once more (trails you marked stay) and Undo all unticks every trail. Very faint trails can be missed: mark those by hand. This isn't AI and doesn't need GraXpert.
Compare. Original, Side by side and Enhanced switch the view. In Side by side, drag the line across the picture.
Crop. In the Crop section, pick a shape: Free, Original shape, Square 1:1, 4:3, 3:2, 16:9 (wide), 4:5 (portrait) or 9:16 (phone). A box appears over the picture with the area outside it dimmed and a rule-of-thirds grid. Drag the box to move it, or drag a corner to resize it; it keeps the chosen shape, and the size in pixels shows below. Press ✓ Done and the preview shows just the cropped area. ✂ Change crop reopens the box and Remove crop goes back to the whole picture. Gradient removal and color balance are still worked out on the whole picture, so a tight crop doesn't throw them off. ✨ Auto keeps your crop; Undo all removes it. The saved JPEG is cropped at full resolution. ✨ Auto-crop scans the picture's edges for empty black strips, noisy fringes and uneven brightness left by dithering, field rotation or the edge of the stack, crops them off, and says what it found. Adjust it with Change crop or undo it with Remove crop.
Saving. Choose the File type: JPEG (small, for sharing), PNG or TIFF, each in 8-bit or 16-bit. 16-bit keeps far more tones, which matters if you go on editing the picture in another program; TIFF 16-bit is the usual choice for that. The File name starts as the original's name with _enhanced on the end; change it if you like. Save puts a full-size copy in your Pictures\Nebulink folder (it never replaces a file: a number is added instead), where JPEG and PNG copies also appear in the Album under Saved on this PC. Save as… opens Windows' own Save as window to pick the folder, name and type; after that, Save uses the same folder until Nebulink is closed. Your original file, on the Seestar or this PC, is never changed.
Share picture. Saves the enhanced picture (about 1400 pixels across, as shown) with a dark caption strip along the bottom: the target and its name, frames × exposure, total time, filter, date and the scope. It goes to your Downloads folder as a JPEG, ready for social media or a forum.
Please note. Enhance is a quick way to get a picture you can share straight from the Album. It doesn't replace dedicated astrophotography software such as PixInsight or AstroWizard, which give you far more control. Results depend on your data, your sky and your settings, and we can't guarantee that any picture will come out perfectly. Your original files are never changed, so you can always process them elsewhere. PixInsight, AstroWizard and GraXpert belong to their respective owners; Nebulink isn't affiliated with them.
Analytics
The Analytics page (under After) is your imaging history: every night Nebulink ran a plan, and every stacked picture in your Seestar's album. Pick All scopes or one scope, and the time range (30 days, 90 days, 12 months or All time) at the top; everything on the page follows that choice.
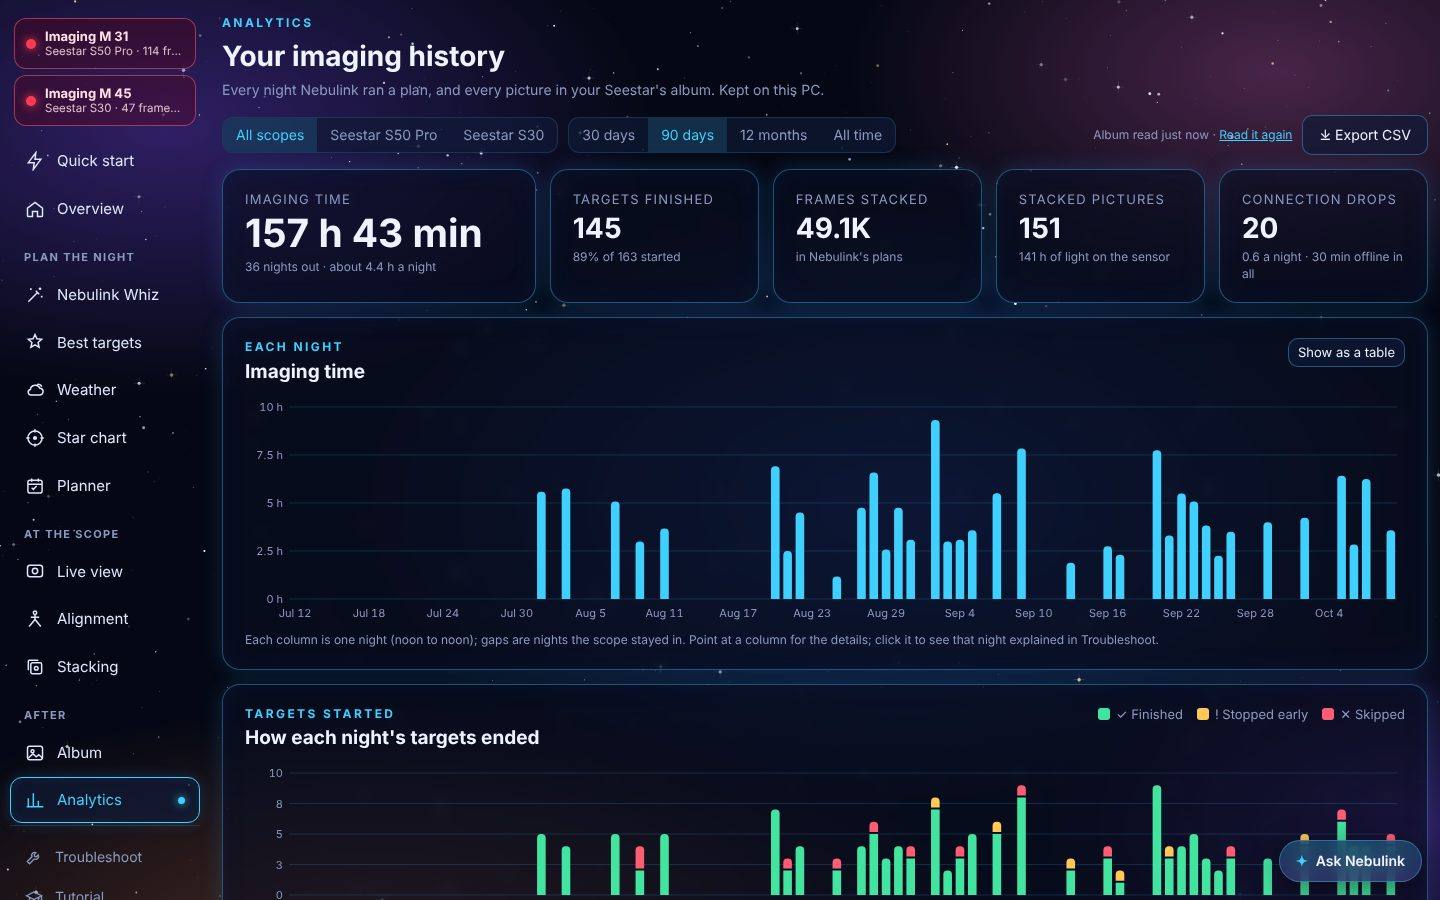
- The totals. Imaging time, nights out, targets finished (and what share of those started), frames stacked, the stacked pictures in the Seestar's album with the light they gathered, and connection drops. With 30 days, 90 days or 12 months, each total says how it compares with the same length of time before.
- Each night. A column per night (per week for 12 months and All time) shows the imaging time; point at it for the targets, frames, connection drops and the Moon, and click it to open that night in Troubleshoot's Last night, explained. Show as a table lists the same numbers. Below it, How each night's targets ended splits them into finished, stopped early and skipped.
- What and when. By kind of object shows your time on galaxies, emission nebulae, clusters and so on, and how many pictures used the LP filter. Hours of the night shows when your imaging happens.
- Your targets. Every target you've imaged, with the nights, pictures, total time, biggest stack and when you last imaged it. Sort by most time, most recent or A to Z; Star chart shows it on the chart and Image again frames it in the Planner.
- Latest pictures from the Seestar's album, Records (longest night, longest single stack, biggest picture, most time on one target, nights in a row, best month), Problems along the way (skipped targets, stacks stopped early, GoTo retries, connection drops), Your nights with Explain for each one, and Pictures saved here on this PC.
- Night report. The calendar marks every night a plan ran, with the hours imaged, and (with a dashed outline) the nights that only have stacked pictures in the Seestar's album. It opens on last evening; click any night to see its scopes and targets, then press Preview the report, or ⤓ Save PDF to save it straight away. The report has the date, the darkness and the Moon, the totals, a timeline of the night, and for each target a thumbnail of its stacked picture with when it was imaged, the time on target, the frames, exposure and filter, the light collected, how high it was and how far from the Moon; a skipped target says why. The notes from the night come last, as in Troubleshoot. The thumbnails are read from the Seestar's album, so turn the scope on first. The PDF goes to your Downloads folder (Letter paper in North America, A4 elsewhere); Print sends it to a printer instead. The report follows the scope picked at the top of the page.
- Export CSV saves every night, target and picture in the chosen range as a spreadsheet file.
- AstroBin details makes the file AstroBin imports for a picture's acquisition details. Pick a target: Nebulink lists its stacks from the Seestar's album, one line per night (the biggest stack of each night, or every stack), with the frames, exposure and date. Save the CSV file or Copy it, then in AstroBin choose Edit acquisition details → Import from CSV. AstroBin numbers its filters itself: to fill in the filter too, type AstroBin's number for your IR-cut and LP filters (from the filter's page address in AstroBin's equipment database); Nebulink remembers them.
Where the history comes from. Nebulink reads its own log for each night a plan ran, and keeps what it finds in history.json in its data folder, so nights stay in your history after the log has moved on. Nights before you started using Nebulink's plans aren't in it, but the Seestar's album is: Nebulink reads the album's file names (they include the target, the number of frames, the exposure, the filter and the date) when the scope is on and connected, at most every 10 minutes; Read it again at the top reads it now. Everything stays on this PC.
Projects and mosaics
Projects. A faint target often needs many hours, more than one night gives. Make it a project: on the Analytics page, under Projects, type the target and the hours you want (or press + Project next to a target in Your targets), then Add project. Nebulink adds up the imaging time on that target from every night since, across all your scopes, and shows a bar toward the goal. Plan tonight frames it in the Planner; Mark finished puts it away when you're happy (Carry on brings it back). Nebulink Whiz puts unfinished projects that are up tonight at the top of its picks, marked ★ Project.
Mosaics. Some targets are bigger than the Seestar's view: the Andromeda Galaxy, the Veil, the North America Nebula. In the Planner, choose a Mosaic size (2×1 up to 3×3) before you add the target. The framing on the photo shows each numbered panel, overlapping a little, and the Planner's advice suggests a size when a target won't fit. During the plan, Nebulink images the panels one after the other, sharing the target's minutes between them, and each panel is its own stacked picture in the Album. Join them afterwards in a program such as your stacking software, Microsoft ICE or Photoshop.
Settings: alerts, phone, horizon, backup
Click ⚙ Settings in the page list.
- Updates. Shows this version and the result of the daily check for a new one. When a newer version is out, a banner at the top of every page links to the download; Not now hides it until the next version. The check only reads a small public file on getnebulink.com and sends nothing about you or your PC.
- Phone alerts. Two free ways to get them. ntfy: install the ntfy app on your phone, press Make one up here for a long random topic name, save, and subscribe to the same topic in the app. Anyone who knows the topic name can read it, so keep it long. Discord: in a Discord channel's settings, under Integrations, create a webhook and paste its link here. Tick the events you want, switch alerts on and press Send a test. The same alert is sent at most once every 30 minutes; the scope alerts (not answering, battery, storage) are checked only while a plan runs.
- Nebulink on your phone. Press the phone icon at the top of any page, or switch it on here and press Pair a phone, and scan the QR code with the phone's camera (or open the address shown and type the 6-digit code). The code works once, for 5 minutes. The phone must be on the same Wi-Fi as the PC; the first time, Windows asks whether Nebulink may use the network: allow Private networks. The phone then opens Nebulink's pages directly. A few things stay on the PC: quitting, choosing folders (a phone copies pictures only into Pictures\Nebulink or a folder already listed under Saved on this PC), the license, backups, sending logs to support and these settings. Phone access works on your home network only. Remove unpairs a phone; switching it off closes the door to all of them.
- Your horizon and spots. The drawing shows the sky around you from North through East, South and West, with a dot every 15° (up to 90°, for a house right next to the scope). Drag each dot up to the top of the trees, roofs or hills in that direction (the dashed line is 30° up). All up 5° and All down 5° move the whole line, and Flatten lowers it to nothing. A place can have several spots, for example the north, south and west corners of your yard, or two ends of a beach: + New spot starts one, type its name in the box, and Save this spot keeps it. Pick the spot your Seestar is at from the Spot menu here, on Best targets or in Live view; each Seestar remembers its own. Open sky (no horizon) turns the horizon off. When you take the Seestar somewhere else, Nebulink uses the spot saved there (within about 3 km), or none. The star chart then shades the hidden sky, and Best targets, Whiz and the Planner count a target as up only when it's above that spot's horizon. During a plan, a target behind it is skipped. Small orange dots are points you marked from Live view; Forget the marks clears them (the line stays). Delete spot asks you to press it twice.
- Backup. Save a backup downloads one file with your scopes, places, plans, horizon, projects, imaging history, alerts and appearance. Restore a backup… reads such a file back, replacing those settings (Nebulink asks first). Your license and the connection key are not in the backup.
Nebulink Helper
The ✦ Ask Nebulink button in the bottom-right corner of every page opens the Helper. Type a question or press one of the suggestions. The Helper works offline: it answers from this manual, your scopes and Nebulink's log on this PC, and nothing you type or say is sent anywhere.
Ask out loud. Press 🎤 next to Ask and say your question, for example Turn on the dew heater or What should I shoot tonight? The button glows red while it listens and stops by itself when you pause (or press it again to stop). A moment later your question appears and the Helper answers it as if you had typed it. The speech is turned into text by a small speech model that comes with Nebulink and runs on this PC, so it works without internet, and the recording is thrown away straight after. The first time, the browser asks whether Nebulink may use the microphone: choose Allow. If it doesn't hear you, check the microphone is chosen in Windows (Settings > System > Sound > Input) and that Settings > Privacy & security > Microphone lets desktop apps use it. It understands English; catalog names work as you'd say them (M thirty one, NGC seven thousand).
Read answers aloud. Press 🔈 at the top of the Helper to have answers spoken with Windows' own voice (it turns to 🔊); press it again to stop. Handy at the scope with the laptop out of reach. Nebulink remembers the choice.
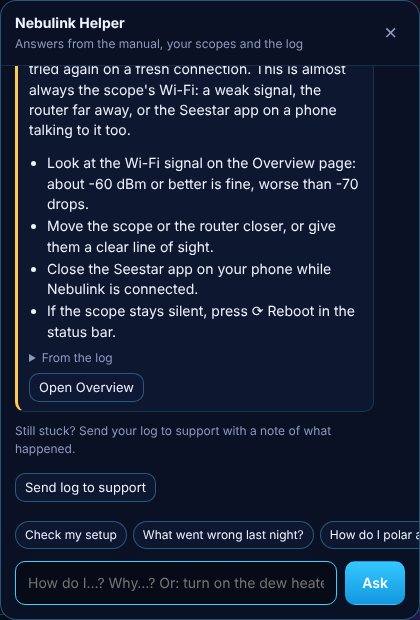
- How-to questions. Ask things like How do I polar align? or What does Stacked mean? The Helper shows the part of the manual that answers it, with Show in the manual to jump there.
- Problems. Ask why something isn't working (Why does the S50 Pro keep dropping out?), or press Check my setup. The Helper checks each scope (connection, Wi-Fi signal, battery, storage, dew heater) and reads the last 3 hours of the log, then explains each problem it finds, how often it happened and what to do.
- Requests. Tell it what to do: Turn on the dew heater at 60%, Close the arm on the S30, Stop imaging, Run autofocus, Turn on the camera, Reboot the S50 Pro, Open the Album, Switch to the S30, Send my log, Copy my pictures to the PC, Start the tutorial, Show me something amazing (Quick start), What went wrong last night? (Troubleshoot) or Switch to the Relic theme. To move around, say a page name on its own (Planner, Weather, Album, Settings) or Open the star chart, Go back, Night mode on / off and Close the helper. Start the plan (or Start the plan on the S30) opens the Planner and its usual Start the plan? box. Before it changes anything on a scope, the Helper asks you to press Do it. The full list is in Voice commands.
- Quick status. Ask How's the battery?, Is the dew heater on?, How much space is left? or What's the S30 doing? Ask What's new? for the changes in this version.
Name a scope (S30, S50 Pro) to ask about that one; otherwise the Helper uses the scope chosen at the top of the page. The Helper answers in English.
Voice commands
Open ✦ Ask Nebulink, press 🎤 and say one of these (or type it; typing works the same). The speech is recognized on this PC, with no internet, and in English only. Add a scope's name to any of them (…on the S30, …on the S50 Pro); otherwise the command is for the scope chosen at the top of the page. Anything that moves or changes a scope asks you to press Do it first. Press 🔈 at the top of the Helper to hear the answers (see Nebulink Helper).
Control the scope
- Turn on the dew heater, Turn on the dew heater at 60%, Turn off the dew heater
- Open the arm; Close the arm or Park (a scope in EQ mode goes to its EQ home position and stays in EQ mode)
- Stop imaging (it also stops a running plan; the frames so far are kept)
- Start the plan: opens the Planner and its usual Start the plan? box
- Turn on the camera (Live view, no stacking)
- Run autofocus
- Reboot the S50 Pro
- Switch to the S30: makes it the scope chosen at the top of the page
Move around
- A page name on its own: Planner, Weather, Star chart, Album, Alignment, Settings…
- Open the star chart, Show the album
- Go back
- Night mode on, Night mode off
- Close the helper
- Start the tutorial
Shortcuts
- Show me something amazing: opens Quick start
- What went wrong last night?: opens Troubleshoot
- Copy my pictures to the PC or Free up space: opens the Album with the steps
- Send my log; Save my log
- Switch to the Relic theme (any of the ten themes by name, or Switch to the Nebulink theme for the original)
Quick questions
- How's the battery?
- Is the dew heater on?
- How much space is left?
- What's the Wi-Fi signal?
- What's the temperature?
- What's the S30 doing?
- How many hours have I imaged? (and other questions about your totals)
- What's new?
Anything else is answered from this manual or by checking your setup: How do I polar align?, Why is there no picture?, Check my setup. Catalog names work as you'd say them (M thirty one, NGC seven thousand).
Planets
The Planets page (under At the scope, next to Moon) is for Mercury, Venus, Mars, Jupiter, Saturn, Uranus and Neptune:
- Layouts. Choose how the page is arranged with Layout at the top: Cockpit (the planets, the picture and the camera controls side by side), Control rail, One column (best on a phone), Tabs or Step by step. Nebulink remembers your choice.
- Pick a planet. Each button shows how high the planet is now and in which direction; a dimmed one is below about 15° and the scope won't slew to it. The facts under the buttons are its brightness, size in the sky, how much of it the Sun lights, when it rises and sets, and its distance.
- Slew and center. Slew to … and center it sends the scope to the planet in its Solar System mode (planets are too bright for star mode). Nebulink then finds the planet in the camera's picture and moves the scope a little at a time until it is in the middle, and (if Autofocus after centering is ticked) the scope focuses itself. Center it on the picture does the same from where the scope points now.
- Live view. Zoom up to 8×, Steady view (see Moon photography), exposure and gain, Save photo and Record video.
- Getting detail. A planet is a few dozen pixels across, so a single picture is soft. Record a short video and stack it in a free program such as AutoStakkert, then sharpen the result. Jupiter's bands and moons and Saturn's rings show; Venus shows only its phase.
Moon photography
The Moon page (under At the scope) is for lunar pictures:
- Layouts. Choose how the page is arranged with Layout at the top: Cockpit (everything on one screen), Control rail, Tabs or Step by step. Nebulink remembers your choice.
- Popular craters. Click one to send the scope to it. Each one shows its region and an approximate size. The scope goes to the crater once the Moon is high enough.
- Moon map. Shows the near side of the Moon, north up, with a dot for each popular crater. The ring marks the one you picked. Click a dot to pick that crater too. The picture is a NASA photo, so dot positions are approximate. Photo: NASA, image GSFC_20171208_Archive_e001515.
- Live view zoom. Zoom 1×, 2× or 4×, or set a custom zoom with the slider, to see the Moon's craters larger on screen. The picture is cropped on the screen, not in the scope. With Autofocus when zoomed in ticked, zooming in also starts an autofocus.
- Moon now. Where the Moon is in your sky right now, its phase picture, and the next principal phases (New, First quarter, Full, Last quarter) with their dates and times. The first chip is Tonight.
- Moon in the sky. A chart of the Moon's height through the night, like the target chart, with the 15° Seestar limit and the 30° good imaging height marked, with its altitude and azimuth now and the next moonrise and moonset. Click the chart to see it full size.
- Slew to the Moon and center it. Sends the scope to where the Moon is right now, the same as a GoTo from the star chart. Nebulink then plate-solves the picture and centers the Moon. The scope won't slew while the Moon is too low in the sky: Nebulink's minimum height for a GoTo, when your location is known.
- Photos and video. Save a photo of what the camera sees now, or record a video of the Moon. They are saved to your Pictures\Nebulink folder. The Moon page doesn't stack anything: the Seestar can't stack the Moon the way it stacks other objects.
- Camera in Solar System mode. Turn on camera on the Moon page starts the camera in the Seestar's Solar System mode, made for the Moon and the planets, so the Moon isn't over-exposed. If the scope isn't pointing at the Moon, it asks first, then moves there and centers it. When the Moon is too low, the camera starts in star mode instead.
- Centering the Moon. The scope can't plate-solve next to the bright Moon, so Nebulink centers it by its picture: after Slew to the Moon and center it or Turn on camera, and whenever you press Center the Moon on the picture. It makes two small test moves to learn which way the picture moves, then moves the Moon to the middle. If the Moon isn't in the picture at all, bring it in with the arrows first.
- Exposure and gain. Under the live picture, untick Automatic exposure to set the camera's exposure and gain yourself. Lower them when the Moon looks washed out or too bright. They go to the scope straight away; tick Automatic exposure again to go back.
- Zoomed photos. When Live view is zoomed in, Save photo keeps just the part you see, cut from the scope's full-resolution picture. At 1× it saves the whole picture.
- Where they're saved. Photos and videos go to your Pictures\Nebulink folder. Press Change folder… under the buttons to save them in any folder you like, or Use the default to go back. Live view uses the same folder.
AI processing on a lunar picture is done in Enhance, as for any picture, so the original picture is kept as it was made.
Not yet tested on a real Seestar: the crater GoTo direction and offset, autofocus and zoom in Live view, the prompt when a plan is running, and the Moon above the horizon in the sky chart.
Troubleshooting
The Troubleshoot page. Click Troubleshoot near the bottom of the page list. Nothing on it moves the scope.
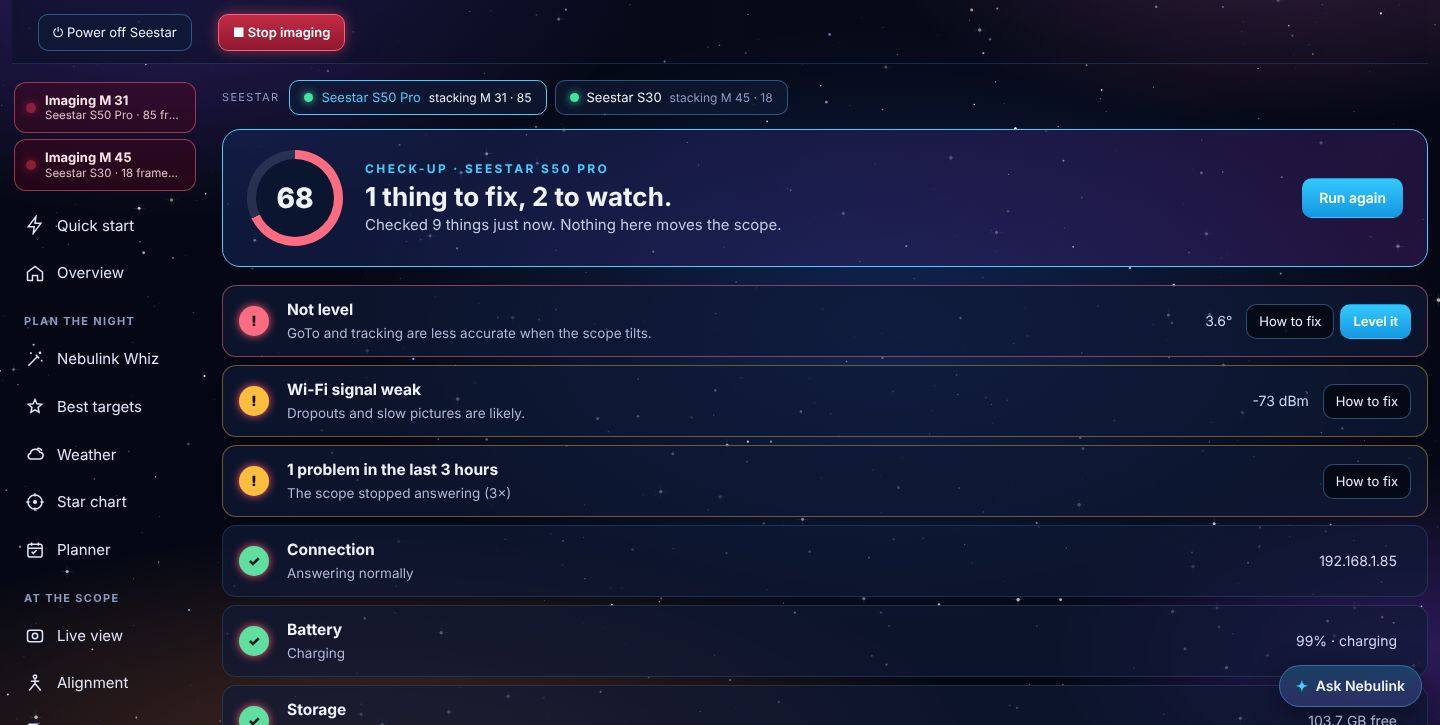
- Check-up. Checks the selected Seestar right now: connection, Wi-Fi signal, battery, storage, level (or EQ mode), location, the dew heater against tonight's dew risk, the firmware, and any problems in the last 3 hours of the log. Problems come first, red for things to fix and amber for things to watch, each with How to fix and often a button that does it (Free up space, Fix location, Turn heater on, Level it). The score at the top drops for each problem. Run again checks again.
- Last night, explained. Nebulink reads its own log on this PC and tells the story of a night, target by target: how long each one stacked and how many frames, GoTos that needed more tries, targets skipped (and why), connection drops (grouped, with how long each lasted), Nebulink being closed during a plan, dawn, and parking. Anything that went wrong comes with what it means and what to do. The tiles at the top count the imaging time, targets done, connection drops and skipped targets. Choose another night with the buttons (up to a week back, as far as the log goes). In the daytime it opens on last night. Send log to support sends the log with a note.
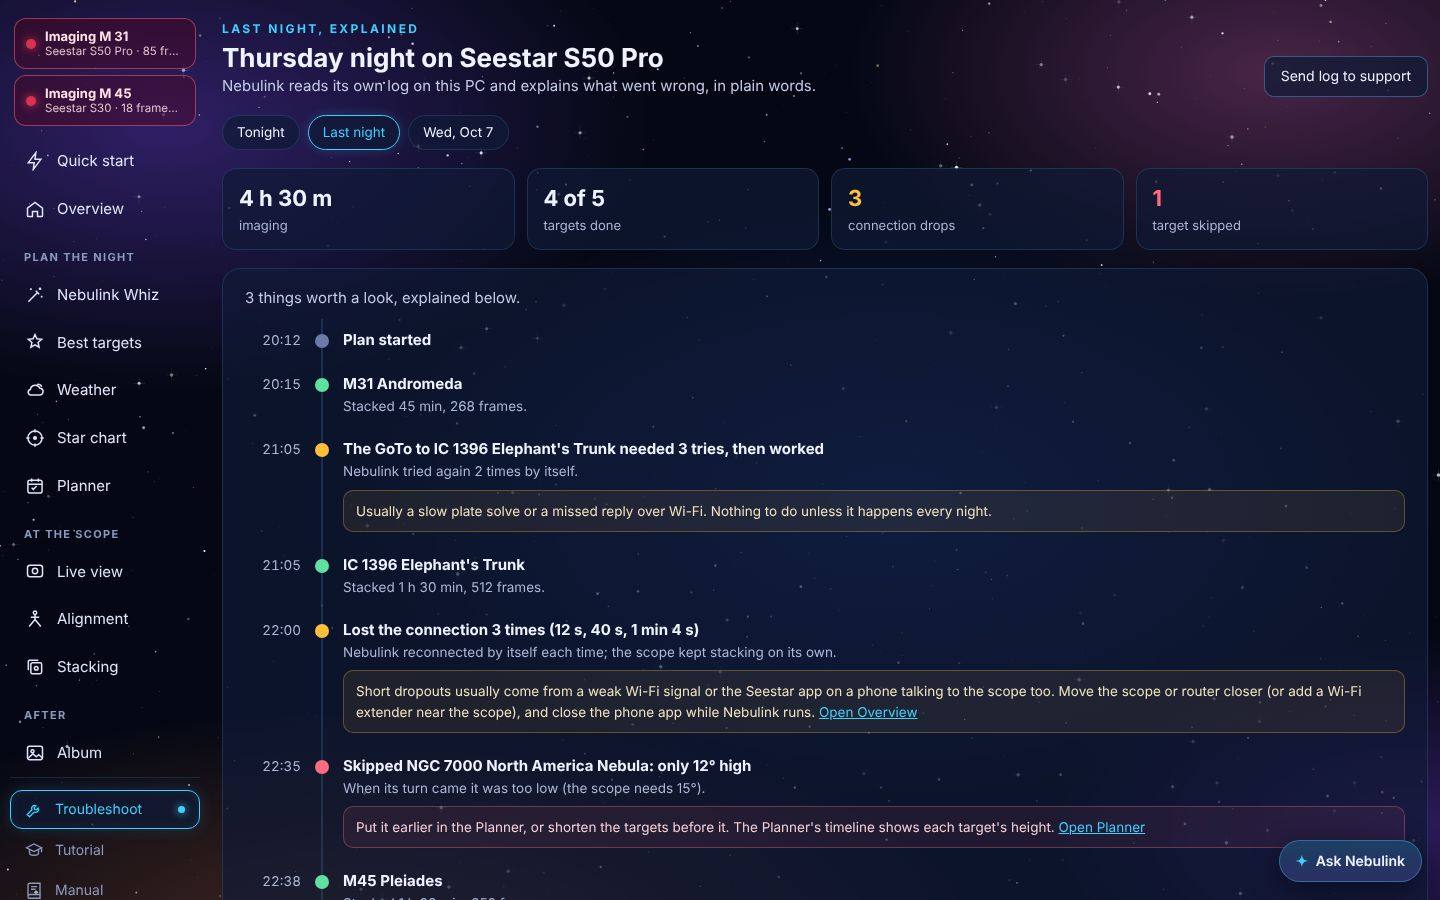
Most problems come down to the network, the connection key, or the Seestar app holding the scope. Start with the row that matches what you see.
The log. Nebulink keeps a log of what it does and of any errors, with the time of each. It's in %LOCALAPPDATA%\Nebulink\logs (paste that into File Explorer's address bar). It holds the last five files of about 1 MB each and stays on your PC. License keys and the Seestar connection key are never written to it. When something goes wrong, open About and press Send log to support, write a short note of what happened and roughly when, and press Send log: the log goes straight to Nebulink's developer, and you get a reference to mention if you write about it. (It needs internet on the PC; passwords and keys are removed first.) Save log for support instead saves the same zip file to your Downloads folder, with the logs and a short summary of your Nebulink version and scopes, for you to email. For a hard-to-catch problem, tick Detailed logging on the About page first: Nebulink then also records every command it sends to your Seestars and their replies, the scopes' own messages and what the pages ask for, in a separate file (nebulink-detail.log, up to about 30 MB). Make the problem happen again, then save the log. Detailed logging switches itself off after 24 hours.
| What you see | What to do |
|---|---|
| Status bar says Unreachable | Check the scope is on and in Station Mode. Its address may have changed: press Find my Seestars on the Overview page to find it again. Close the Seestar app on your phone. |
| The Seestar keeps saying "Please update to the latest version" | The scope is answering an app that hasn't signed in with ZWO's connection key. Set up the key (Installation step 3) with the newest Seestar APK. Until the key is set up, Nebulink stops contacting a scope that asks for it, so the scope goes quiet; it carries on by itself once the key is in place. If it still talks, press Quit Nebulink and check that no other PC or older app is connected to it. |
| The scope shows status but ignores commands | The connection key is missing or doesn't match the firmware. Repeat step 3 of Installation with the newest Seestar APK. |
| Find my Seestars finds nothing | Check the scope is on and joined to the same Wi-Fi as the PC (Station mode in the Seestar app), and that you allowed Python through Windows Firewall. Guest networks and some mesh routers keep devices apart; if so, type the address under Or type its address. |
| A scope shows up but its name is just "Seestar" | The connection key isn't set up yet, so the scope can't say what model it is. You can still add it; set up the key (Installation step 3) to control it. |
| The browser can't connect to 127.0.0.1:8050 | Nebulink isn't running. Start it again from PowerShell and keep that window open. |
| "seestarpy isn't installed" or "Live view needs OpenCV" | Run pip install seestarpy opencv-python numpy pysmb, then restart Nebulink. |
| No weather or sky photos | The PC needs internet for these. Press refresh on the Weather page or the Conditions card. Best targets still ranks targets without a forecast. |
| Live view says No video or The camera is off | The Seestar only streams video while its camera is running. Press Turn on camera, or GoTo a target. If the camera is on and there's still no video after half a minute, use Stacked or Single frame and send a log from the About page. |
| No stacked image yet | The scope isn't stacking, or hasn't stacked its first frame yet (that takes about one exposure). Start a stack, or switch to Single frame. |
| The stacked picture takes a long time to appear | On the Stacking page, set Stacked picture from the scope to Fast. If it's still slow, the scope's Wi-Fi signal is probably weak: move the scope or the router closer. |
| A scope keeps dropping its connection | Its Wi-Fi signal is probably weak where it sits. Move it or the router closer, or press ⟳ Reboot in the status bar. |
| A new button or setting doesn't appear after an update | The browser tab still shows the old page. Press Reload now on the banner at the top, or press Ctrl + F5. |
| Location in the status bar is wrong | Click it and set the right location (see Setting the scope's location). Target heights, darkness times and plans all use it. |
| GoTo button is greyed out | The target is below 15°, or it's the Sun, Moon or a planet. The message under the button says which. |
| A plan target was skipped | It was too low when its turn came. Move it later in the queue or pick a higher target. |
| Add to plan seems to do nothing | Look for the green bar under the button (Added … as number 3) and press View plan ↓: the list is further down the page. An amber bar means the target is already in the plan; press Add again to add a second copy. The button is greyed out while a plan is running. |
| Comets says it couldn't download the list | The PC needs internet once to download the comet list from the Minor Planet Center; after that Nebulink keeps a copy (comets.txt) and refreshes it every two days when online. An empty Comets list is normal when no comet is brighter than magnitude 13. |
| Whiz finds no targets | Go back to Interests and tick more kinds of targets, or untick Famous showpieces only. A short window (until bedtime) or a night with no full darkness also leaves fewer choices. |
| Whiz says a plan is running | Stop the running or waiting plan on the Planner page, then press the Whiz's button again. |
| Album can't find the files | Press Find automatically; Nebulink signs in as Guest by itself. If the message mentions pip install pysmb, run that command and restart Nebulink. If the message says Windows is blocking guest access, follow the next row. (File Explorer itself uses the user name Guest with no password.) |
| Allow Windows guest access yourself | Nebulink doesn't change this setting for you. Open PowerShell as administrator and run Set-SmbClientConfiguration -EnableInsecureGuestLogons $true -Force and Set-SmbClientConfiguration -RequireSecuritySignature $false -Force, then press Find automatically again. This lowers protection for every network folder on this PC, so only do it on a network you trust, like your home Wi-Fi. The row below undoes it. |
| Undo the Windows guest-access change | Open PowerShell as administrator and run Set-SmbClientConfiguration -EnableInsecureGuestLogons $false -Force and Set-SmbClientConfiguration -RequireSecuritySignature $true -Force. Nebulink's own Guest connection keeps working either way. |
| The interface is too bright at night | Press Night mode in the header. |
Safety, credits and copyright
Safety
- Never point a Seestar at the Sun without its solar filter fitted. Nebulink blocks GoTo to the Sun.
- Make sure the arm has room to move before a GoTo, opening or closing the arm, a reboot (which folds it home first), or switching to EQ mode.
- Unattended plans park the scope at the end and stop at dawn. Cover or bring the scope in if rain or heavy dew is forecast.
- Power off can only be undone with the scope's power button.
Credits. Nebulink uses seestarpy for the telescope connection, star and constellation data from d3-celestial © Olaf Frohn (BSD license), deep-sky positions and sizes from OpenNGC © Mattia Verga (CC BY-SA 4.0) and the Stellarium deep-sky catalog, DSS2 sky survey images via the CDS hips2fits service, star positions for labeling pictures from ESA's Gaia DR3 catalog via the CDS VizieR service, satellite orbits from CelesTrak and the SGP4 orbit code from python-sgp4 by Brandon Rhodes (MIT license), comet orbits from the IAU Minor Planet Center, planet and Moon pictures rendered from maps by NASA/JPL-Caltech (Mars), James Hastings-Trew (Jupiter, from Cassini data), Oleg Pluton (Mercury, Venus, Saturn, Uranus and Neptune; CC BY 4.0) and Ruslan Kabatsayev (Moon, from NASA LRO data; CC BY-SA 4.0) via the Stellarium project, weather forecasts from MET Norway (data from MET Norway, CC BY 4.0, converted by Nebulink to °F, mph and an hourly layout), place names from GeoNames (geonames.org, CC BY 4.0), town names from GeoNames (geonames.org, CC BY 4.0), and OpenCV and NumPy for image processing.
Weather history: NASA Langley Research Center (LaRC) POWER Project, funded through the NASA Earth Science/Applied Science Program (power.larc.nasa.gov, CC BY 4.0).
Trademarks. Seestar and ZWO are trademarks of Suzhou ZWO Co., Ltd. Nebulink is an independent product and isn't affiliated with or endorsed by ZWO.
Contact. Paul R. Smaglik · support@getnebulink.com · getnebulink.com
Community. Show your pictures, swap tips and tell Paul what Nebulink should do next on the Nebulink Discord server. Post only your own pictures, and keep your location and Wi-Fi details out of anything you share, including log files (send those to support instead).
© 2026 Paul R. Smaglik. All rights reserved.